 Purpose
Group Members I did this project with Sammie and Kazuha. ______________________________________________________________________________________________ Beforehand Assignments: We were required to do research on lava lamps before constructing one.
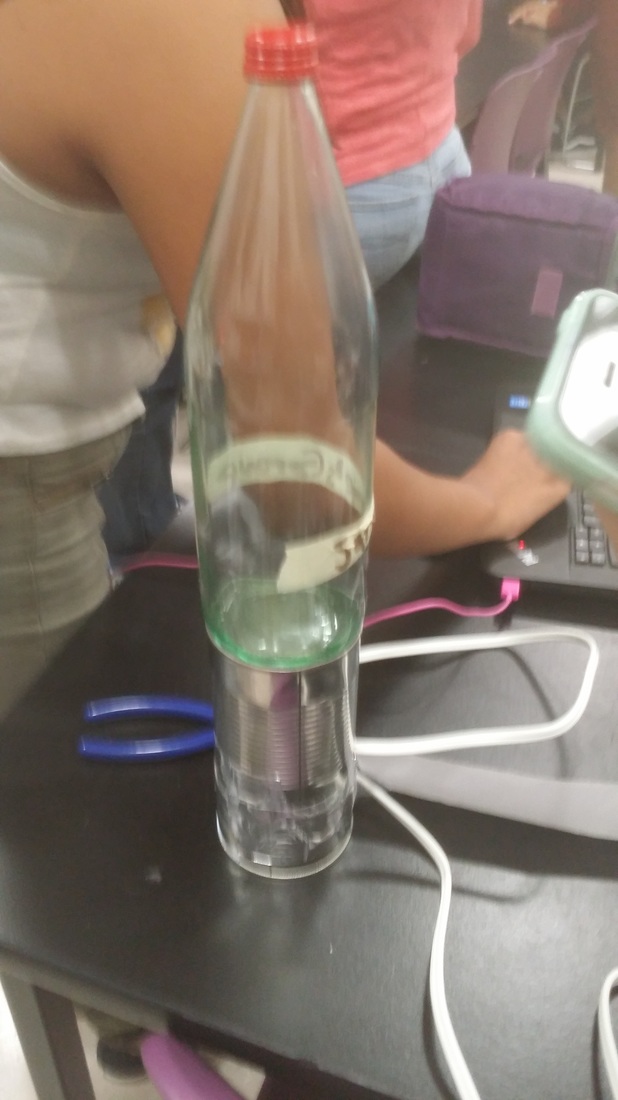
____________________________________________________________________________________________________ Construction Planning: Blueprinting We had to draw out a blueprint/diagram of how we are planning our lava lamp to look like. We wanted a simple design. We bought our glass bottle beforehand, so we modeled the glass container of the lava lamp after it. Here is our first draft: 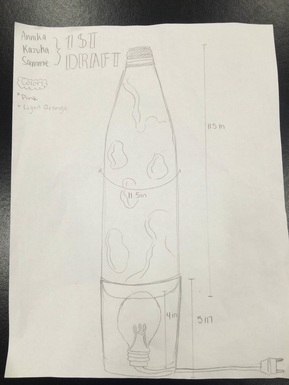 Critique:
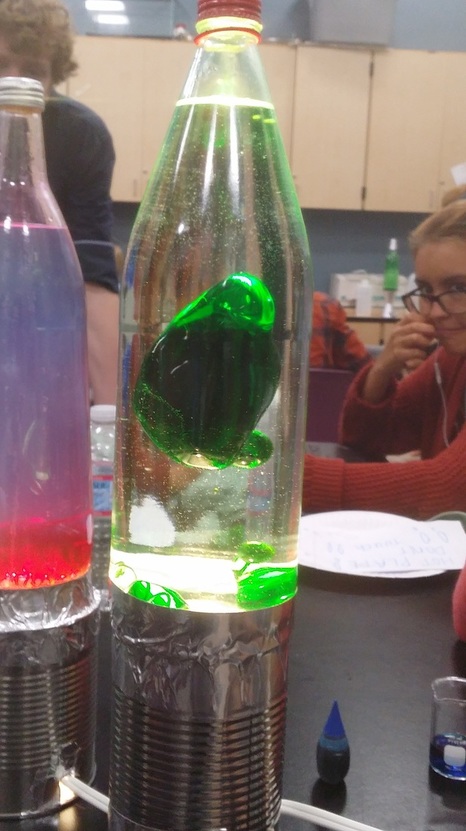
So we improved it and made a second draft. The critique was helpful and it made us think about how we can construct a way to keep the light bulb upright. 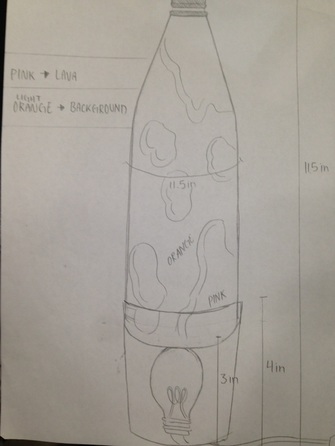 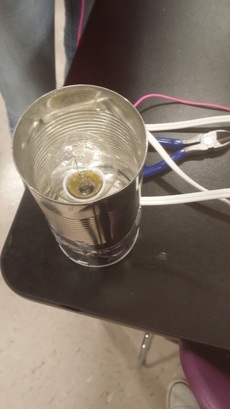 Design Explanation: Our design has a glass soda bottle that is 11.5 inches high. The base we got was a tin dole fruit can that was approximately 4 inches and was 20 oz. The lightbulb was 3 inches tall. The circumference of the glass soda bottle was 11,5 as well, while the tin can was about a circumference of 11. Design Changes: We first has just one 20 oz tin can. But we took off the top and bottom cover without realizing that we needed a cover on the bottom of the can. And so we went and bought a smaller can with the same circumference to tape onto the end of the other can. We needed a base platform, and so the other can served as one. Our base became extremely tall. We were able to keep the light bulb on our in can to heat the lava lamp properly. ____________________________________________________________________________________________________ BEGINNING OF LAVA LAMP CONSTRUCTION Pre-Lab/Safety Precautions
Materials
Directions:
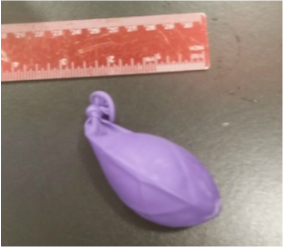
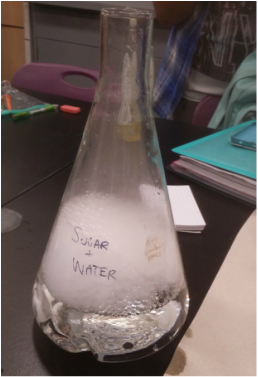
Pre-lab Thoughts I was really excited to be able to build a lava lamp and to see how it works and all, but I was also scared that it wouldn't work well. It was a first real project that we were going to do this year and I had big hopes for the final product. I knew that it wouldn't look like the store bought lava lamps that worked really well, so I didn't know really what to expect out of our home-made one. ____________________________________________________________________________________________________ The salt makes the water denser, which makes the little lava lighter, makes it fly up. What Happened? - A Lava Lamp Story STAGE 1 - Beforehand Construction During class one day my group and I went and began to gather our necessary materials. We went and bought an italian soda that was inside a glass bottle approximately 11.5 in tall. We also went and bought two dole Pineapple fruit cans from Vons. (One that was the first part of the base and the smaller tin can to be later added onto the base.) After consuming the contents inside the food containers, I went to clean out the tin can. After I washed it out with water at the sink, I grabbed paper towels to wipe it down. I wanted it to dry quickly so we could begin building already. I wiped the inside area of the cup and began to spin around the inside edges, and the side of my hand got cut under the freshly opened tin can. I was sent to Marcus due to bleeding cut on my hand. We cut a hole on the bottom area of our tin can, so the chord could go through. And we later received a tin can and a light bulb. We placed the light bulb in and realized we need a bottom to support the light bulb. We connected another can and taped it together with metal tape. And at this point we finished constructing the basic outer area of the lava lamp. STAGE 2 - Beginning of Chemical Aspect We began to mix chemicals to create our lava. I let my group members pick the colors, and so we chose a green based color pallet. We were given benzyl alcohol in a beaker, filled around 1/4th way. The Andrew took the lime green that we chose and cut it open. I watched in awe for I never thought about the insides of a sharpie. Nor have I thought about ever opening one up. He dropped the sharpies into the benzyl alcohol, and didn't remove the plastic. Slowly the water began to turn more and more green as the sharpie's oiled settled. The sharpie oils and the benzyl alcohol mixed in together to create a lime green. STAGE 3 - Mixing Chemicals Again We then prepared to make the backgrounds. We mixed water with Sodium Chloride (salt). Then we poured that mixture into our glass bottle. Andrew told us to mix beakers with our palm and fingers grasping the top of our beaker. And the you have to gently swish it up.. 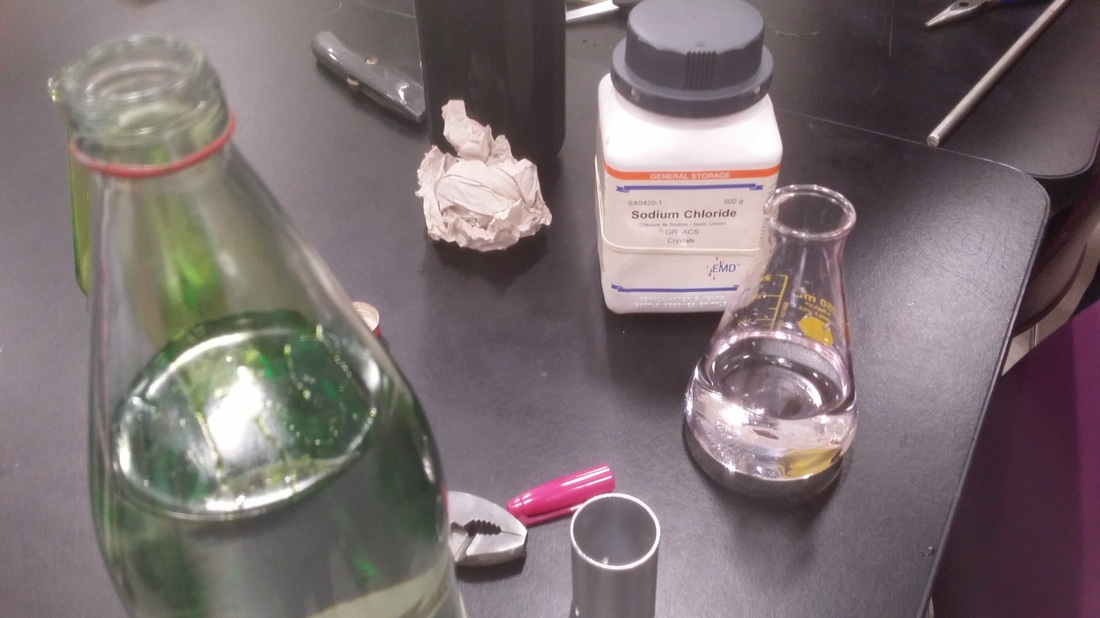 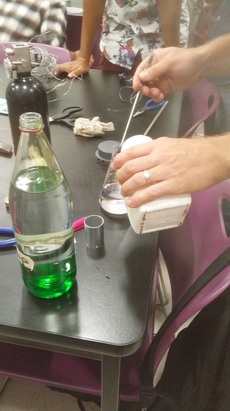 We filled the bottle with water and then we began to add our lava into our bottle. It was really cool how the lava which was "hydrophilic" was repelling the water. It was honestly reminding me of boba. (tapioca pearls) After adding in the water. We started to add in the salt water into the water bottle. It was cool as it went down into the lava lamp, the lava started to ripple.
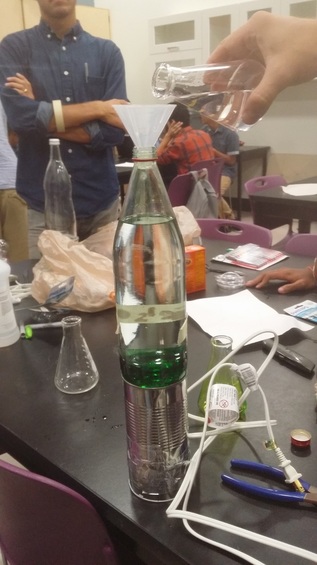 After adjusting the density levels, we plugged in the lava lamp. We waited for it to heat up and then we kept on adjusting the water to make the lava move in portions. We also added metal springs into the water to make the lava stay on the bottom. STAGE 4 - FINAL PRODUCT Our final lava lamp had a bunch of spring in it. I made them long and they rode up the side of the glass (it didn't look too good). Our lava moved up as one blob on the first day, then we let everything settle overnight. We came back the next day and plugged it in, to our surprise it started spitting out little bubbles everywhere instead of breaking apart in chunks of lava. (again it didn't look too good). I would overall say it worked in a unique way. ________________________________________________________________________________________________ Things I learned: KEY SCIENCE TERMS - SCIENCE ASPECT
-A Hydrophilic Chemical - Where the molecules conjoin with the water to make one ionic/hydrogen bond. "a water- The reason we mixed the sharpie with the benzyl alcohol is because they were both hydrophobic, and they doesn't mix with the water. Since the lava is hydrophobic it stayed separated from the water.
Group Contributions: I contributed to the group by taking pictures, helping clean up, preparing our materials and sharing ideas and thought on how things worked. I worked in a group with Kazuha and Sammie. We worked together buy buying and supplying different materials that we needed, by taking turns cleaning the materials. We had system of documentation in our group.
Things I would do Differently: I would have probably considered that we needed a base on our first tin can. Because of our first mistake of cutting off both sides of the can, we had to buy another one to provide us base to stick the light bulb to. I should have looked at our design considerations more carefully. Our lava lamp base wouldn't be that tall, and it would be more stable. I also would have probably stuck our glass/base together in a way where it wouldn't look super sketchy. We used the tape that was metal, it looked like foil wrapped around a soda bottle and so it was a bit sketchy looking. Maybe next time we could make it a lot more professional looking. I would have also tried not to put as much springs in as we did. It looked sloppy afterwards and I made the springs too long that it went up along the side of the glass. What was enjoyed? What wasn't? I enjoyed creating this lava lamp overall. It was cool to do our first ever project, and it made me realize how much freedom and responsibility was a part of these mini projects. We were really responsible for making sure we have all materials, that we meet all the safety precautions, that we document our work, etc. We really learned how to do everything on our own and we learned how to use our time really good. I enjoyed the freedom of choosing what type of bottle, base, and color of the lava lamp. It made each lava lamp unique and different. In the end, although what happened wasn't really what we wanted it to be, It overall was a good experience that I greatly learned from. It was definitely frustrating at one point when our lava lamp wouldn't show any improvement. And it was also hard when the lava lamp wasn't moving at all. It was difficult to re adjust salt and fresh water and was hard trying to get the best out of the lava lamps formula we used. But still, I feel that the experience was really good. We weren't able to finish perfecting our lava lamp by trying coconut oil and benzyl alcohol with the glass bottle. But it's good to know that others' lava lamps worked after doing that.
0 Comments
Introductory Concepts Illustration Option Create a visual/graphical diagram by hand or using software that describes the phase change diagram. Necessary criteria:
VERSION ONE: Graphic Design Organizer I made a graphic organizer chart of the relationship between matter, substance, elements, compounds, chemistry, mixture, atom, etc. I wanted to straight forwardly display the relations between these concepts. And so I created a diagram that showed the different components branching out to others. They showed the definition of each. First Draft: Here is my first draft of the graphic organizer. I wrote definitions for each of the topics and put arrows connecting to each concept. 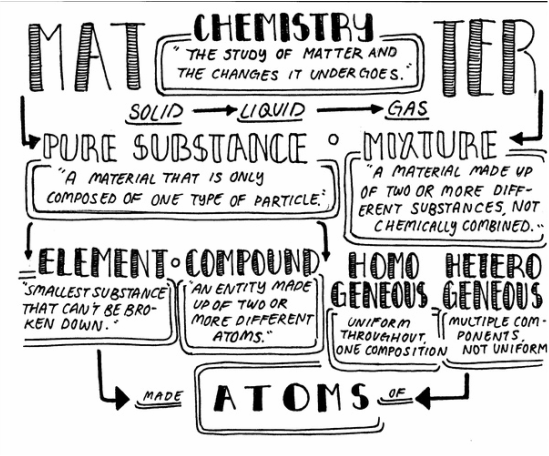 Critique I received:
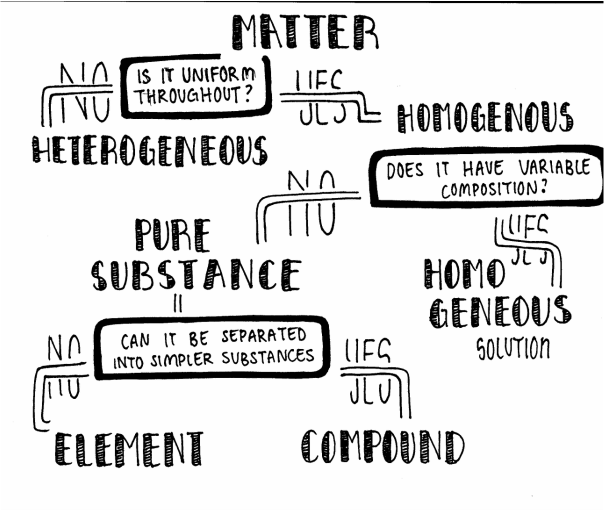
2nd Draft: This is the second draft of graphic organizer. The quality of the scan isn't as good as the other two. But I still incorporated the critique people asked for. I used a larger paper to make the graphic organizer. I put some examples of the different substances below their definitions. I also added a definition for what atoms were. 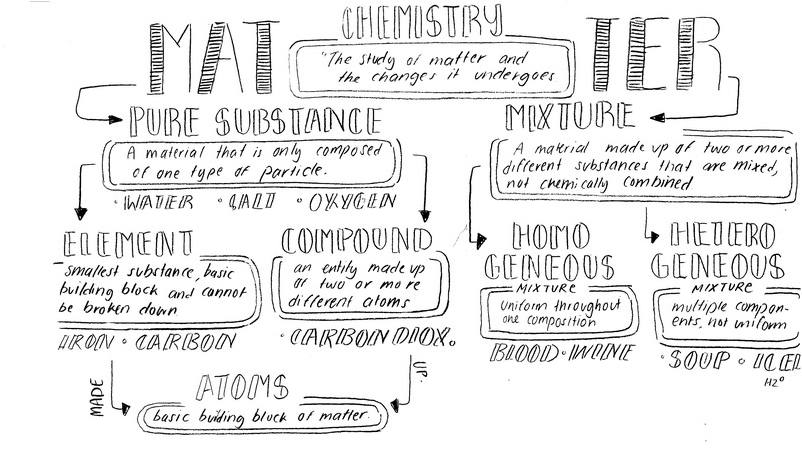 Added Extra: Question based Organizer I created a question organizer. It helps identify certain concepts based on a set of questions. The organizer will have different questions that will ask something that was either relevant or non-relevant to one of the topics. Yes and no will lead it to different concepts. Example: Is it uniform throughout?
  September 2 We had our second Lab Experiment on the different forms of mass today, which was experimenting with dry ice. We did this to find the distance between molecules in gas. Pre-Lab/Safety Cautions Beforehand, we were informed on things about dry ice.
Materials
Directions
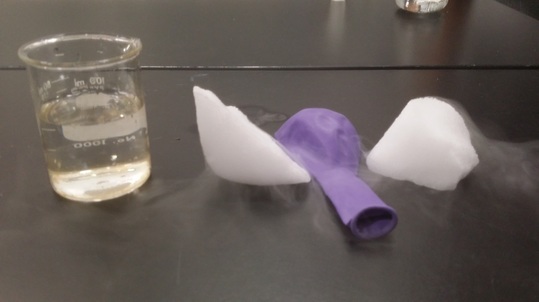
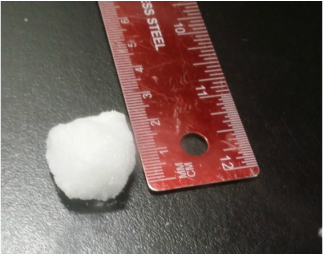
I didn't really know what to expect from dry ice. Relating it to my background knowledge I knew that once it was put in water, the water would start pouring out with a sort of "vapor". But when it came to the balloon, I had no idea what would happen. I was excited to freely experiment with it after fulfilling the requirements. I didn't know so much about dry ice besides its own use, so I was excited to see how other substances reacted to it. ____________________________________________________________________________________________________ What Happened? - A Dry Ice Story All my life the only thing I was told about dry ice was "Don't touch it." So at this point I was hesitant to lay my hands on it, even still after confirming it was safe. I was handed the giant chunks of dry ice and I hurriedly ran to my table with them in my hands. My table and I looked in awe as the vapor was coming from it. We all took turns touching it and complaining how cold it was. Immediately, we wanted to start the experiment. Knowing that we couldn't put the whole boulder in the beaker, we got a steel ruler and smashed the huge chunk into smaller around 2-3 cm pieces. We hurriedly dropped one of the pieces into the water. Watching as it sunk to the bottom and released vapor from the top of the beaker. 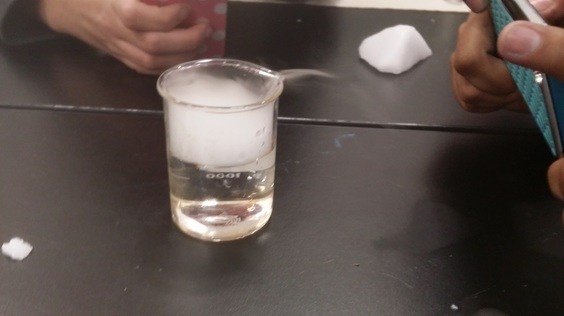 We then continued and started the second experiment. Melany got a ruler and totally smashed all the dry ice into 1-3 cm pieces. We used a 2.5 cm chunk of dry ice to be put in the balloon.
We then opened the balloon and placed the dry ice inside. We tied it up and then Sammie started shaking it to slowly melt the ice. We then moved onto other experiments. (We were free now) Andrew had shown his bubble mix that he created, we eager to try it before other groups. We were given it and we were aiming to blow one bubble onto the beaker of water and dry ice to create a larger bubble. Ash blew a little bubble onto the beaker and we all squealed as it began to grow larger. All of leaned in as the bubble grew on the rim of the beaker. The bubble grew because of the vapor being released from the dry ice and water. After the bubble grew large enough, it popped and all the vapor gushed out. We then eagerly tried it again. This time we blew a bigger bubble, and we noticed that the bubble was staying longer onto the beaker. It didn't seem like bubble would pop anytime soon, so we popped the bubble ourselves. We then took a beaker filled with bubble soap and we placed a chunk of dry ice into it. We happily watched as multiple bubbles came pouring out of the beaker instead of the usual vapor. 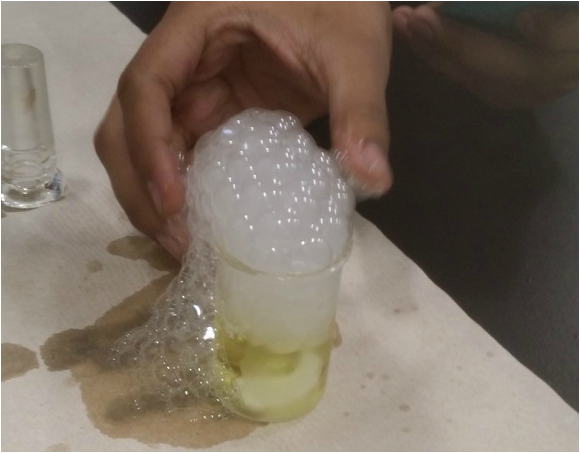 Afterwards, Ash and I had the same idea. We grabbed a huge beaker from the shelf and filled it 1/8 with water.
We grabbed the whole beaker of bubble soap and poured all of into the beaker of water. Immediately, bubbles began to grow. We threw in more dry ice and the bubbles grew bigger and began to fill up the beaker faster. We all panicked as it began to pour out of the beaker, running to get paper towels and a glass container to place the beaker in. My group members then grabbed food coloring, wanting to turn the bubbles green. They eagerly poured some food coloring into the beaker waiting for green bubbles to come out, but sadly it didn't Even if the source of the liquid was green, it had no effect on the dry ice and the vapor/bubbles being released from it. 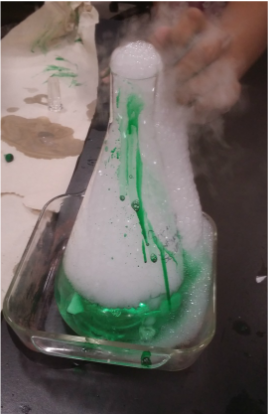 The green food coloring just made an even bigger mess. We then checked back on the balloon we had filled with a 1-2 cm dry ice. To our surprise it became around 7.2 inches! I feel like if the dry ice was any bigger, the balloon would have exploded. 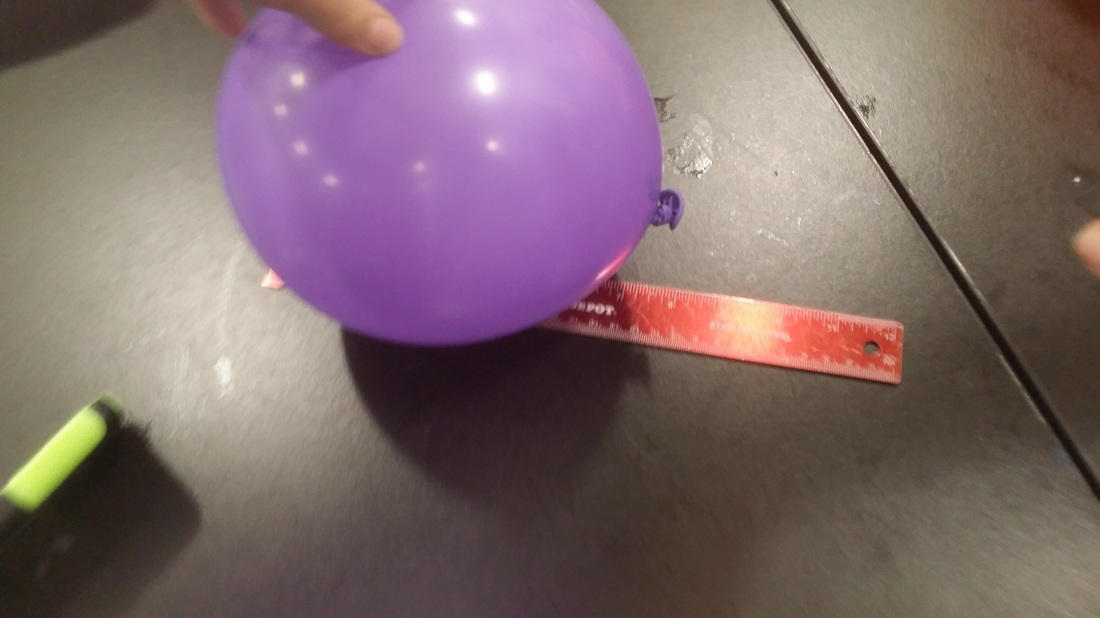 Our last experiment was getting a beaker of water and dry ice and putting a balloon over the rim of it (the opening). The balloon inflated quickly as the fog released was going inside of it. But late we were told to take it off for it might have exploded. 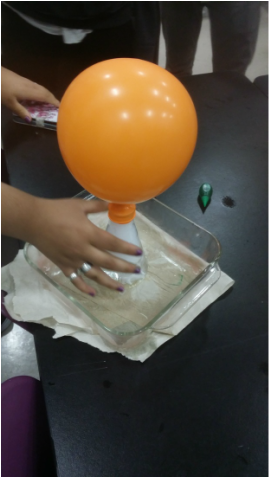 Overall the experience was fun and I learned a lot more about dry ice. Although I half burned myself with it, I am encouraged to learn a lot more about it.
What I learned? Noticed?
Experiment Key Experiment One - Placing dry ice into a beaker filled with H20 (water) Experiment Two - Placing a 1cm piece of dry ice into a balloon Experiment Three - Blowing a bubble onto a beaker filled with dry ice and water Experiment Four - Placing a piece of dry ice in a bubble soap mix Experiment Five - Placing a large amount of dry ice into a huge beaker filled with water and a large amount of bubble soap Experiment Six - Food coloring the water Experiment Seven - Placing a balloon over a beaker filled with dry ice and water Group Contributions: I contributed to the group by taking pictures, helping clean up, starting new experiments, and sharing ideas and thought on how things worked. I worked in a group with Kazuha, Ash, Natalie, Melany, and Sammie. We worked together and did different experiments at the same time, documenting all of it to be shared and emailed to each other later. Things I would do differently? I don't think we could've done it any better differently. Since it was an experiment, it was expected that we would do things that wouldn't work. It was all about exploring and I don't regret doing things like putting the food coloring into the beaker, we just learned a lot more from making those mistakes. What was enjoyed? What wasn't? I enjoyed messing around with the so called "forbidden to touch" dry ice from my childhood. I was originally scared of touching dry ice but I was glad to overcome that fear. I enjoyed the freedom of being able to mess around to make our own experiments after doing the requirements. I enjoyed looking back on it and trying to decipher how things happened and the reason for them. For me, there wasn't necessarily an area of the exam that I disliked. It was messy, but it was a lab so I didn't expect it to be very clean. I enjoyed getting my hands dirty and doing like pretty much whatever I wanted with the dry ice without being told "No you can't do that." or "No that will never work" I overall really enjoyed the lab and I felt good to be able to do whatever I wanted with the experiment without having someone shooting down my ideas. I had no limits when doing this experiment. 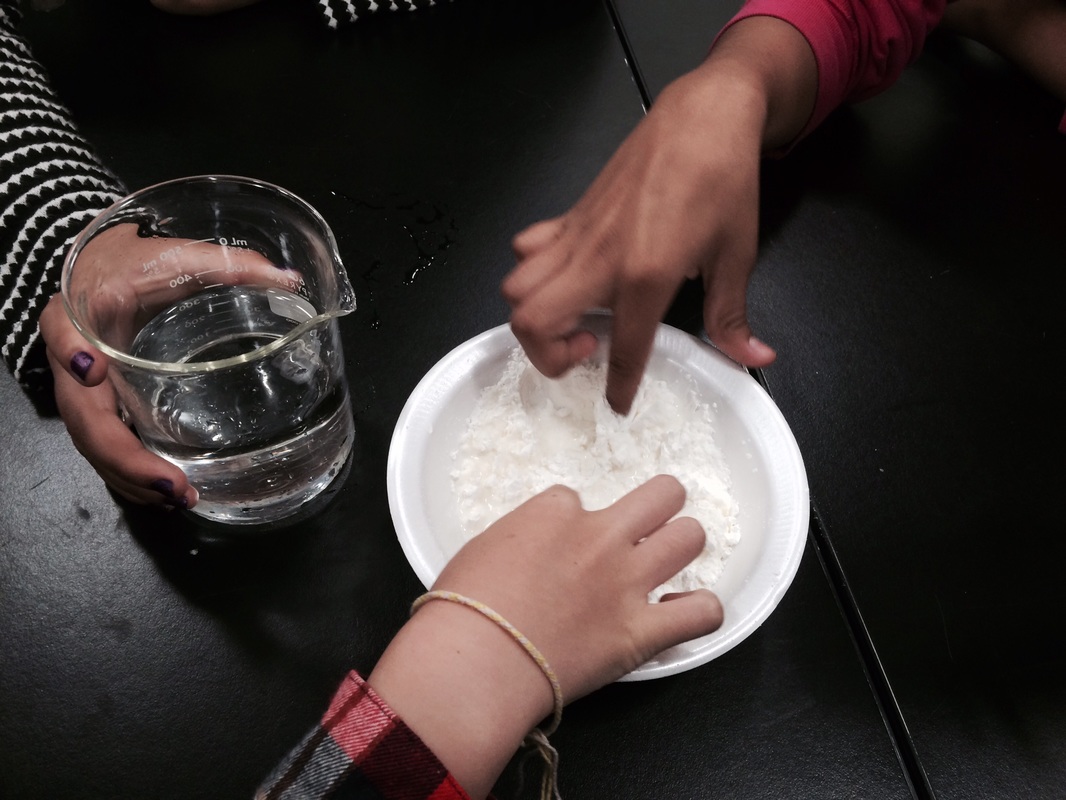 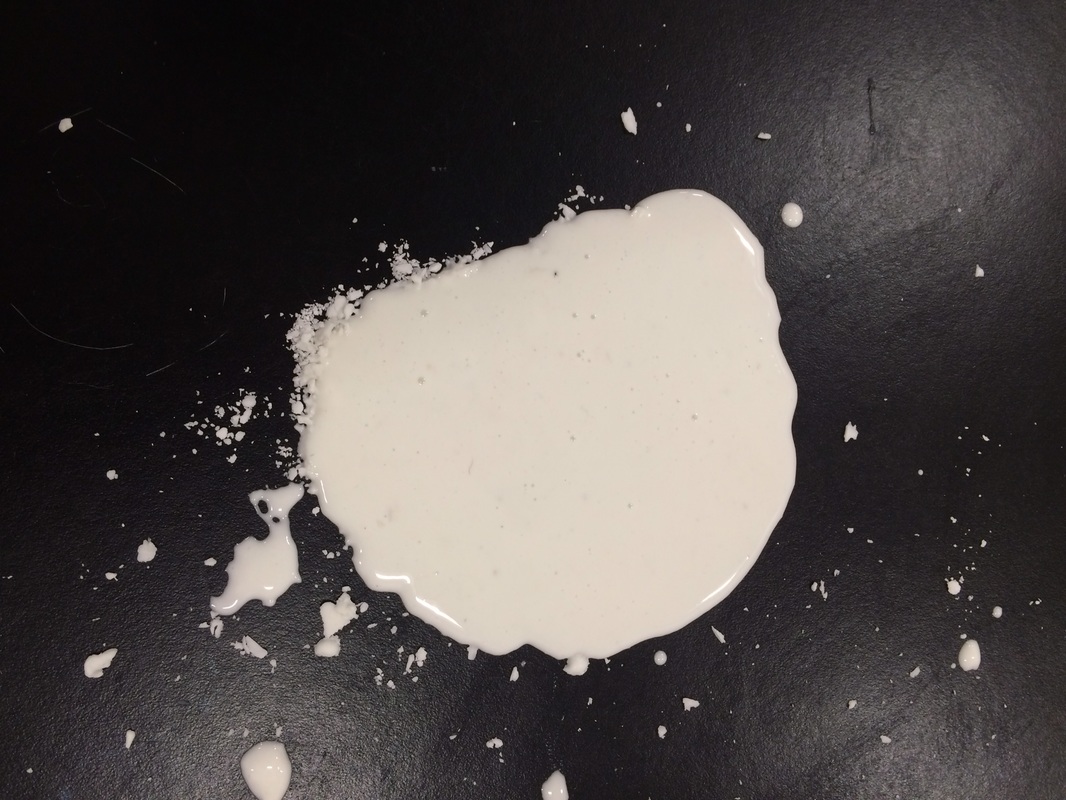 September 1 We had our first ever Lab Experiment today, which was creating a substance called Ooblek. Pre-Lab Beforehand we had a lesson on mass and it's three different forms. The three forms were solid, liquid, and gas.
Materials
Since I knew water was being involved, I imagined that the corn starch would mix in with the water and would become a sort of watery "batter like" substance. I didn't expect the corn starch to act far differently than how flour would when mixed with water. I honestly thought that the form would stay on the majority of the liquid side. We were told that the lab was going to be "messy" so I thought that the water aspect of the experiment was going to make it very messy. ____________________________________________________________________________________________________ What Happened? - An Oobleck Story I worked with Kazuha, Sammie, Melany, Natalie, and Ash. We got our beaker of water and our corn starch. At first we were hesitant to pour so much water in, we thought that the corn starch would lose its form. But we were surprised as the water we poured in felt like it was absorbed right into the corn starch. The corn starch was only getting a little damp as we added in water. We then poured the whole beaker of water in the corn starch. After putting in so much water I expected the corn starch to slowly and finally dissolve into the "smooth cake batter" consistency like flour would. But to all of our surprise, no matter how much our fingers mixed the corn starch, it had stayed at the bottom of the bowl under the large amount of water we put in. My table mates piped up saying things like "Guys it's not working" , or "move your hand you're not mixing it right!" or "Aw it's been five minutes and we already ruined it." In confusion we looked at the other tables, we watched as they got their whole hand dirty trying to mix the oobleck. We went back and did the same. We mixed and mixed until the form (consistency) smoothed out. Even after we mixed I noticed that the water kept drying and leaving the corn starch not moist at all. I panicked, almost about to dump more water into the bowl, but then Brayden came over and showed us something that literally blew my mind. I watched in awe as he picked up the bowl filled with (what I thought) was dry oobleck. He began to tip it, and in my mind I thought the oobleck would just fall onto the table like a sad pancake. But to my surprise as he raked the oobleck out of the bowl, it became to pour down like a waterfall onto the table. Not knowing ho w to comprehend how the oobleck changed its state, I moved onto another problem. I began to panic again as the oobleck fell onto the table, I thought we would create a huge mess and that the oobleck would seep through the cracks of the table and fall into a big puddle mess onto the floor. I almost ran to get paper towels when Andrew came up and blew up my mind again. He said "watch this" and quickly swept his hands across the table where a pile of oobleck was, The ooblek obediently scraped off from the table and rolled into his hands, he placed it back into the bowl safely. Dumbfounded, I immediately grabbed the bowl and poured it our on the table again. We all played with the oobleck, watching happily as it changed between solid and liquid form. After awhile, some oobleck dried onto the tips of my fingers. But as I touched the bowl full of liquid form oobleck, the dried coat on my hand slowly formed with it. At one point, Brayden came with a hammer. He got our bowl and told us to watch. He hammered hard into the bowl. The oobleck didn't splash in our faces like I would have thought it would. It just withstood the force of the hammer. AS IF IT WERE A SOLID! That got me thinking about how pressure affects the ooblecks state of mass. As he pulled out the hammer, it was clean as if he had never touched it with the oobleck. I noticed how when I dipped my finger slowly into the oobleck, it coated my finger like paint, but when I put more pressure into the oobleck it stayed in a solid form, not leaving a mark or trace on my hand. This and many other things surprised me. It was indeed messy experiment. But was very enjoyable and mind blowing for me. What I learned? noticed?
Liquid? Solid? What form of mass? I feel like this is highly debatable. Oobleck can take both the form of solid and liquid. Although on my opinion, I believe the Oobleck is a liquid that just reacts differently when manipulated. If you don't do anything to the oobleck, it remains a liquid. But it is only when you manipulate, move, put pressure on this liquid that it changes forms into a solid. I feel like at its base it is a liquid. A solid has a definite volume and definite shape, and the molecules shouldn't be able to move at all like Oobleck does.. I don't define Oobleck as something that is for sure a solid. I feel like it's a liquid that can respond to certain conditions to then turn into a solid. Oobleck is first a liquid when you make it, it isn't until you abruptly move that liquid that it changes into a solid. Molecular level explanation: I'm not sure exactly what is happening on a molecular level but I'll say these ideas anyway. Oobleck reminds me of snow. Slow is sometimes soft to make snow angels and to slide down on sleds. And in some cases you can sink your winter boots into snow as if pushing it down with your feet. BUT, in other cases, when we have snowball fights, snow doesn't become the same soft snow we roll around in. In all cartoons and in real life experiences as well, we pat down the snow ball, adding more snow to it while doing so. And all of the sudden, when pressure and impact is being put to the snow, the snow grows harder. We fling these now "hardened" snowballs at our friends and family and watch as they hit very hard on impact. It is almost like Oobleck. When the corn starch molecules or particles (or whatever they are referred to) are pushed together, the create a hard substance. The molecules are pushed closely and tightly together, becoming a solid. The molecules in solids are not able to move around due to being so compact. So the form of the oobleck and snow mimics that. The molecules are no longer able to move around, forces like impact or pressure and pushing the molecules closer together to create a solid form. Snow is almost considered "soft" until we smash our bodies into it and make it into solids. My theory: My theory is that Oobleck is indeed a solid. People may perceive it as a solid but I think the corn starch molecules are just able to mimic a solid form when manipulated. When mixed with water and left untouched, Oobleck is indeed a solid that can leave off a trace on your fingers once dipped in. But once the corn starch molecules are put under forces of pressure such as impact, pressure, or abrupt movement, the space between the molecules grows smaller and more compact, as would a solid's molecules. The oobleck responds to pressure and becomes a strong solid, able to withstand impact due to the temporary placement of molecules. Once oobleck is manipulated, it can change into a solid. It is a liquid that responds to impact by molecular turning into a solid form. The photo below shows how dirty this experiment really was. As you can see, there are scrape marks on the table, that was when we were able to quickly swipe off the oobleck with our hands to put back in the bowl. The video after it shows the hammer hitting the oobleck, showing the force that keeps the oobleck in solid form. "What would happen if that was a liquid?" - "It would go everywhere and splash." 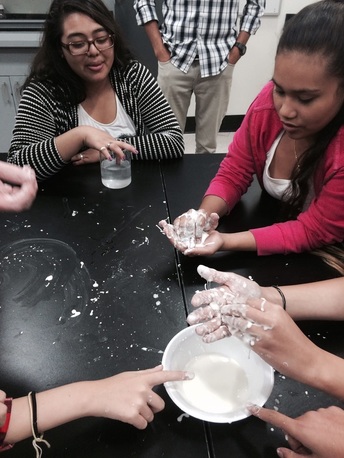 |
AuthorWrite something about yourself. No need to be fancy, just an overview. Archives
December 2015
Categories |

 RSS Feed
