|
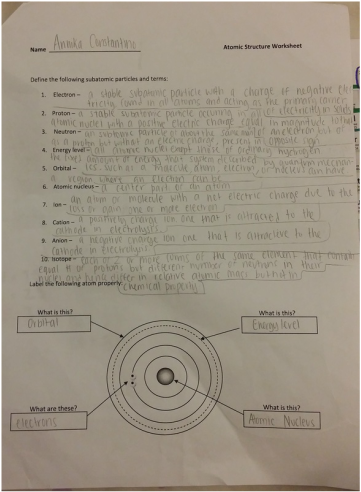
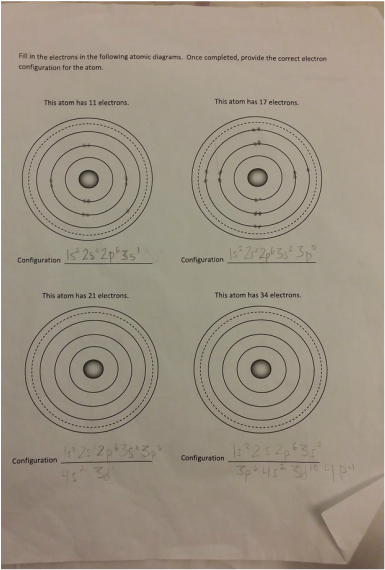
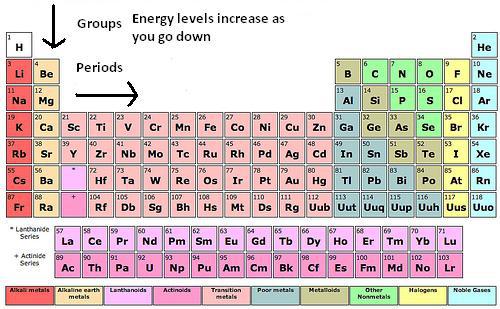
Overview: I really felt like I learned a lot from this work sheet. It helped because we recently did an activity related to the periodic table of elements. I was very confused of how to do the second part of this worksheet at first. I understood the part's of the atoms but after the first page I didn't know how to place the electrons on the atom. After asking Braden he totally enlightened me on how to do it. I was so thankful that he explained it to me, now I understand it really well and it is very good for me to know this for the future. THANK YOU SO MUCH BRADEN! The Periodic Table: Here is the cheat sheet I made of the periodic table of elements. It has different colors showing each "shell" of the elements. To label the configuration I learned that you have to state the Shell Letter which is either S, P, or D, and also how many electrons in the shell. Let's say there is both electrons for the second shell, you would label a exponent 2 for 2P. I learned that on the atom diagram, there are 8 shells and that each of them represent the rows of the periodic table of elements. There is an S side of the periodic table that is on the left. It has Hydrogen and Helium for the first shell (the only exception for S to have electrons from both the left and right of the table), and the rest are going down in pairs of 2. There is a P side of the periodic table on the right, in which Helium is not a part of. It goes in 6' s down for the P. There is also a middle part of the periodic table, it starts on the the 3rd column up until the 12th column. It is the D side of the periodic table. Braden told me that instead of lining up with S and P and starting at 3, it starts at 4D. While S is 3S, D IS 4D. 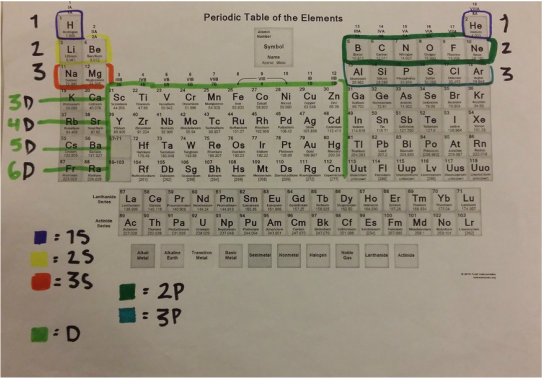 Worksheet: For example: CHLORINE How to get it: The Answer: 1s2, 2s2, 2p6, 3s2, 3p6
0 Comments
Purpose: We did this activity to study more about the earth and what makes up the earth. If we learn more about this we will have a greater understanding of how the Earth has changed in the past and how it may change in the future. Earth science helps us understand the periodic table of elements and about different sources of energy; gas, oil, coal, etc. Which are all very significant to powering our society. ____________________________________________________________________________________________________ PROMPT 2: WHAT INFORMATION/CONCEPTS DID YOU HAVE TO KNOW IN ORDER TO INTERPRET WHAT WAS HAPPENING? Research: Silicates: Combination of Silicon (s;) and oxygen (o). 95% of Earths crust, and 97% of earth's mantile is made of silicates. Layers of the Earth: 97% is silicon and oxygen
 Na2 Si03 : Sodium Silicate Calcium Silicate Ca Cl2 + Na2 SiO3 --------> NaCl + CaSiO3 Calcium Chloride Sodium Chloride 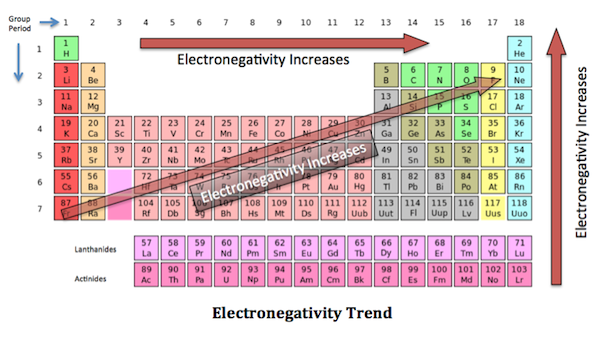
Materials:
Directions:
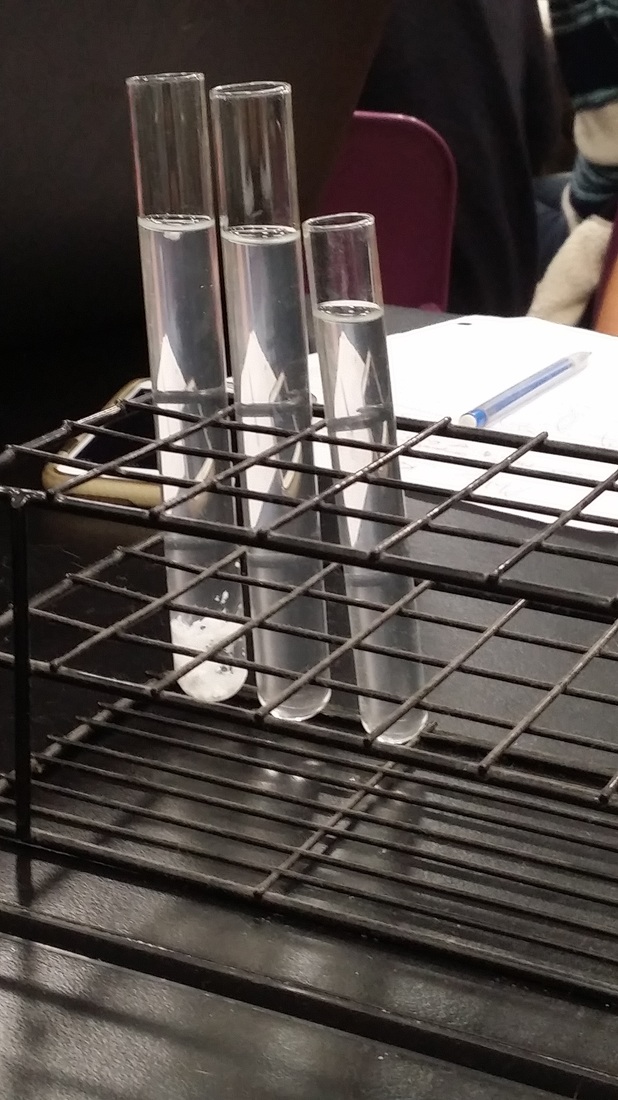
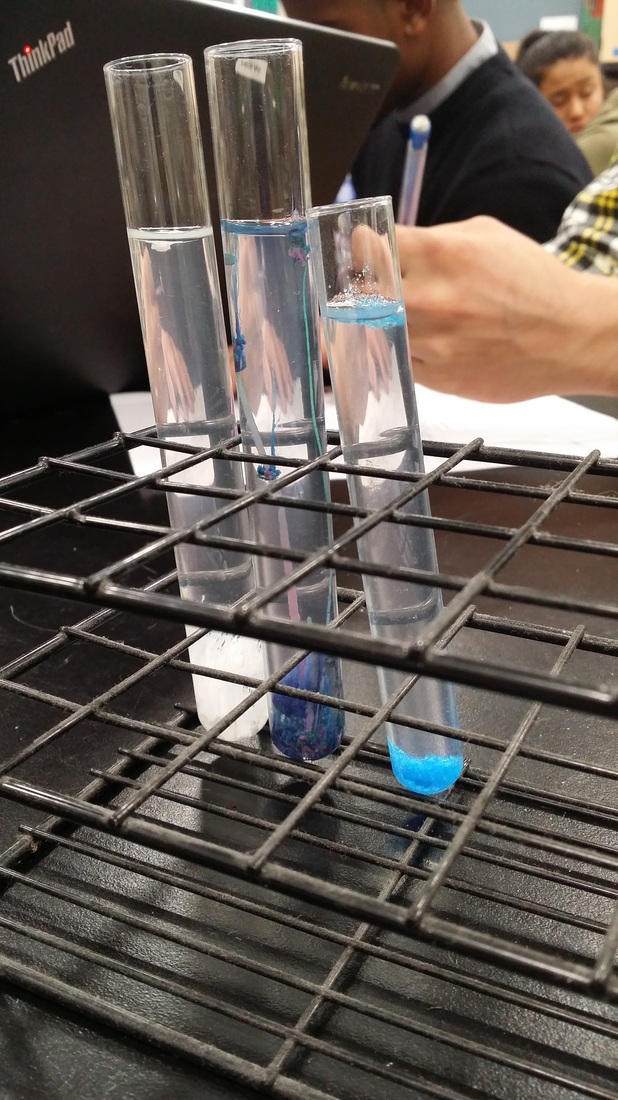
PROMPT 3: TELL YOUR STORY, WHAT HAPPENED? What Happened - A Crystal-Rock Story So after the beforehand briefing that Andrew did, we then got into starting to mix the solutions. We first started with Calcium Chloride. He brought over white balls, and slowly dropped it into the small vials. It wasn't until a few minutes when the balls began to sprout into small little branches. This reaction took the longest. After that, we moved onto the next vial. Andrew got out a red substance called cobalt chloride in which they were very small red balls. He dropped them into the second vial, we watched as they immediately reacted and began to sprout up red long lines that went towards the top of the vial. After that, we moved onto the next vial. Andrew got out a light blue substance called copper sulfate. It stood still at the bottom of the vial, nothing happened except for small portions of it floating upwards to the air. When we finished all the reactions, I later realized that the second vial containing cobalt chloride was now turning into a purple/blue. I also noticed that the last vial, the copper sulfate had an usual quality of being able to keep the liquid inside the vial, however way you turn it. ____________________________________________________________________________________________________ PROMPT 4: EXPLAIN YOUR OBSERVATION, ASK QUESTIONS What I learned? Noticed? Calcium Chloride - With the calcium chloride we noticed that after awhile, there was branch like crystals forming from the white balls. It grew from the bottom of the vial, creating almost a "forest" of white strings going up the sides. It took the longest time for this reaction to happen, longer than the other two vials. 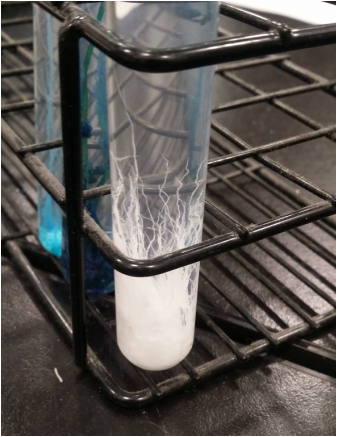 Cobalt Chloride - We first had red beads dropped into the second vile. Immediately, parts of the red beads were shooting up into the top of the vial, they slowly left a trail of red as long strands climbed up the side of the vials. After awhile you notice that the color of these various strands turns from a bright red magenta, to now a purple/blue color. This reaction happened on the spot, immediately when we dropped it in, it started to sprout. It was later when the drastic color change started to happen. 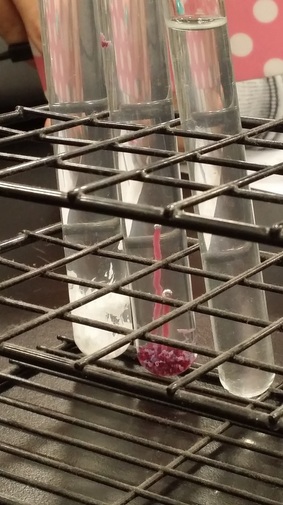 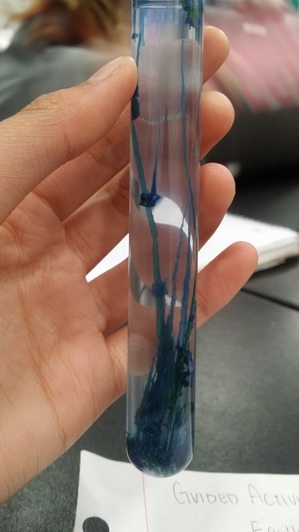 Copper Sulfate - According to Andrew, this mixture didn't work with the solution. He put in small beads of light blue and we watched as half of it stayed on the bottom and the other half rose to the top of it. What I did notice was that afterwards, the vial could be turned upside-down and miraculously no liquid would seep out. It was as if the crystal sealed the exit of the water. Nothing really happened besides them floating to the top. When I revisited these vials the next day 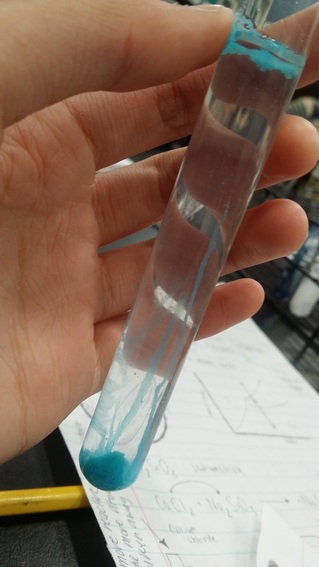 Here are the three different "Crystal" reaction vials.
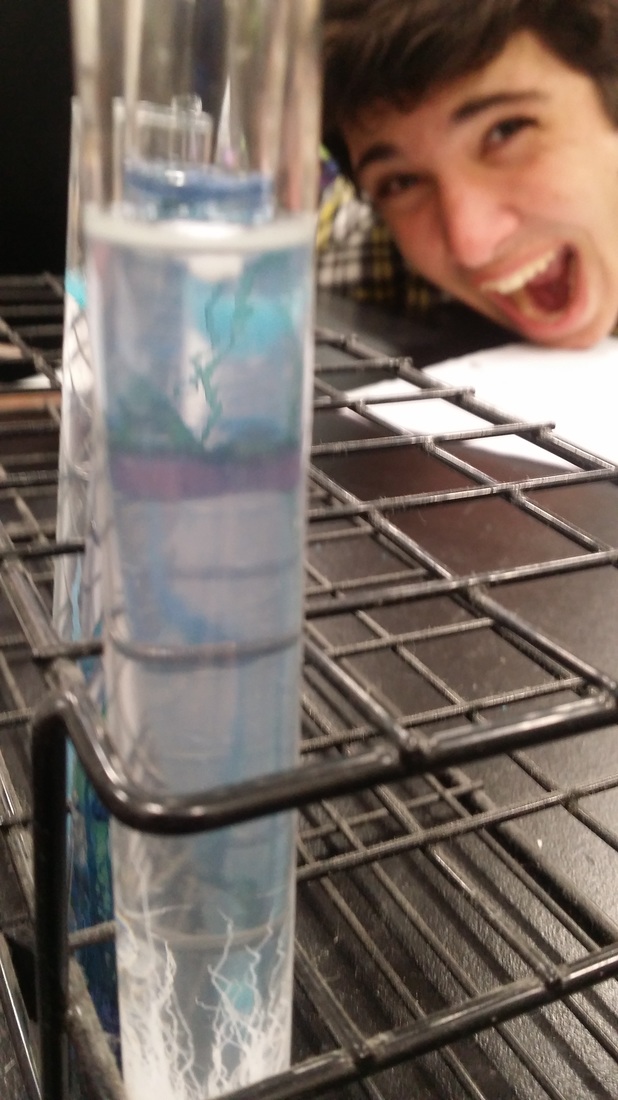
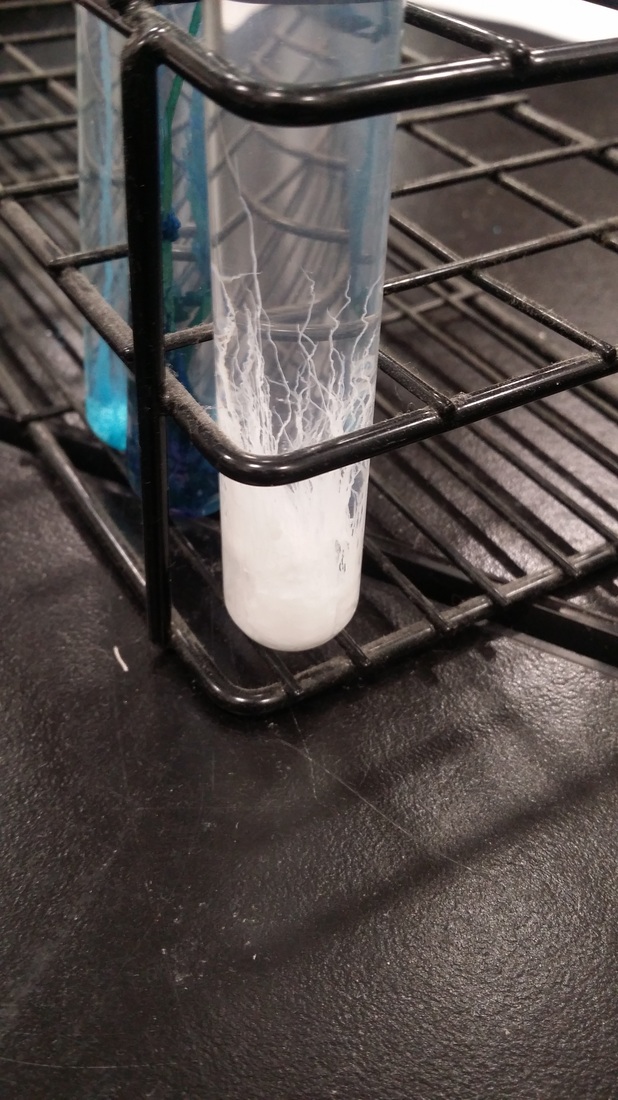
Here is what I noticed once I compared:
I also noticed that the next day, the first two vials were cloudy in white while the copper sulfate stayed a clear liquid/ Questions I have:
PROMPT 1: WHY STUDY EARTH SCIENCE/ROCK FORMATIONS? We did this activity to study more about the earth and what makes up the earth. If we learn more about this we will have a greater understanding of how the Earth has changed in the past and how it may change in the future. Earth science helps us understand the periodic table of elements and about different sources of energy; gas, oil, coal, etc. Which are all very significant to powering our society. (From the purpose area up above as well) Everyday we are trying to discover new things, whether it be a cure to a disease, or to discover the new part of under the ocean. Earth Science is helping us have a better understanding of our earth that we are endlessly trying to discover more about. Rock formations are important for us to see the past of our earth. Places like the Grand Canyon are examples of earth's history, nature making these beautiful scenic formations due to erosion and weather. Learning more about these formations and earth in general brings us closer to understanding what happened on our earth before. PHASE 2: Motor TestsPurpose: To test our motors in our groups. We will see how much thrust our certain paring gives. We will be shooting each motor by lighting it up with a match. Group Members: In this project my project members were Isabel and Sammie. ____________________________________________________________________________________________________ Making the Motor: To create our motor, Andrew simply asked for our combination of size, burner, and fuel. We wrote it down on one of the cardboard motors, and Andrew got them and created each motor over the week. Beforehand thoughts: I wasn't sure how our pairing would go. I was confident in the End Burner/Black Powder combination, for I thought we would get a lot of thrust from that. But I wasn't so sure about our size of 3/16s. We chose to go smaller than everyone else, we were not sure how that will work, whether it will be an advantage or not. I hoped that our motor would work efficiently and that we would get a large amount of thrust. ____________________________________________________________________________________________________ What Happened? - A motor story! Instead of only a portion of groups going, we decided that everyone in the class would be going. Along with Brian's 9th graders who were doing a similar project on rocket motors as well. Each group was required to write a paper with all the information; fuel type, burner, size, name , etc. The paper would be put in front of the go pro before filming. We walked down to the bay, and by random, Andrew and Brian picked out motors and called the groups to test them. We were then called up to go. We are excited to see how the motor would perform. And as we stepped back to watch it, we sadly watched it puff out a cloud of smoke. When we pressed the button, Andrew said that the match wasn't working well. We tried multiple times, about 3 or 4 times. The match wasn't being cooperative! Frustrated, we let another group go instead of us. Andrew and Brian told us that we would go later in the day. We came back after lunch, maybe 4th or 5th period. It was us, and another group from our class, along with Brian's freshman. We walked back to the bay, back to the center of the field. My group members and I waited until it was our turn again. After awhile, the wind was growing stronger, and the air grew colder. We finally were able to test the motor. This time, IT WAS A SUCCESS! We were unsure of how much thrust it gave at the time, but then we just watched as it was performing successfully. Happy with ourselves, we all cheered gladly at out working motor. It didn't have such a powerful sound when it was being tested like the other groups, but it still emitted the shot of power on the end like it was supposed to. We noticed that it was starting to drizzle. Sammie and I requested to go back, and as we were walking it began to pour. It was raining extremely hard, and we had to stop all motor tests. Sammie and I ran back to school with the rain pouring down heavily on all of us. This is the video taken on the GoPro Andrew had. Motor Thrust Curve: Based on this video, we took it and slowed it down on a video program, looking frame by frame to see what the thrust was for each frame increment. After doing a large spreadsheet on google spreadsheet, we then transferred our data into a table chart. It was a line graph that showed the amount of thrust per 1/30th of a second.
To do this we: We put this on a video editing program, and slowed it down. Frame by frame we referred to the thrust for each 1/30th of a second. Our video itself was 8 seconds long, but our thrust began shooting up from 0 at exactly 2 second in. So technically we had a 6 second long video. If we have 1/30th of a second entries, then this means that we have 30 entries per 1 second. Since we have 6 seconds in total, our whole entry total would be around 180 entries. (in our case we had more, it was a little over 6 seconds.) On our spreadsheet, our group worked together to have one person say the different thrust numbers while everybody else fills it into the spreadsheet. We got 187 entries in total. AFTERTHOUGHTS Motor Test Results: Sadly our motor didn't do as well as we thought it would. I had good expectations for it, but sadly compared to everyone else, our thrust was significantly low. I think the reason for that is because of our motor core size of 3/16. The highest our thrust went was 364. Which is not high at all compared to thousands that other groups reached with their rocket. I noticed that everyone else had chosen sizes like 1/4th rather than ours which was 3/16. With our graph as you can see, the thrust doesn't shoot up right away like a normal rocket would. It is only gradually, only after a few moments where it shoots to the highest thrust point. Compared to everyone's graphs, our was the only one that gradually went up and gradually went down. Everyone else's shot up and shot down, a huge spike in the data. The huge spike in the graph means that there was a powerful shoot of thrust happening in the beginning of the launch, then once it reached it's peak it shoots down as well. But with ours, the gradual rising up to the highest point meant that we did not have a strong start. It didn't shoot powerfully into the sky like every other rocket would. It started off small and gradually worked its way up to the peaking point. Which is not what we're looking for if we want a high rocket launch. Other groups used the same gun powder and the end burner combination. I have yet to find out exactly. Questions I had/Researched?
What I enjoyed? I enjoyed watching our motor work finally. The success of being able to see your product work, just like the previous rocket project. The experience was definitely different because we didn't actually build the motor ourselves. We had Andrew make them all, so we didn't really experience the whole process. I feel that I would have enjoyed it more if I felt the whole process of building the motor. What could've been done better? Differently?
Group Work: I feel that I contributed to the group well on this project. We all equally did research beforehand, and I also took the opportunity to draw out our motor and nozzle diagram. We all documented equally and we all helped with the graphing and data plotting of the motor thrust curves. ____________________________________________________________________________________________________ Our Thrust Results: Our thrust results were not the lowest nor were the highest. Here were our results:
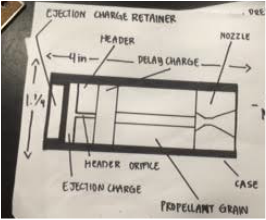
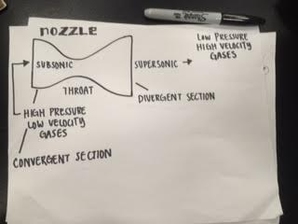
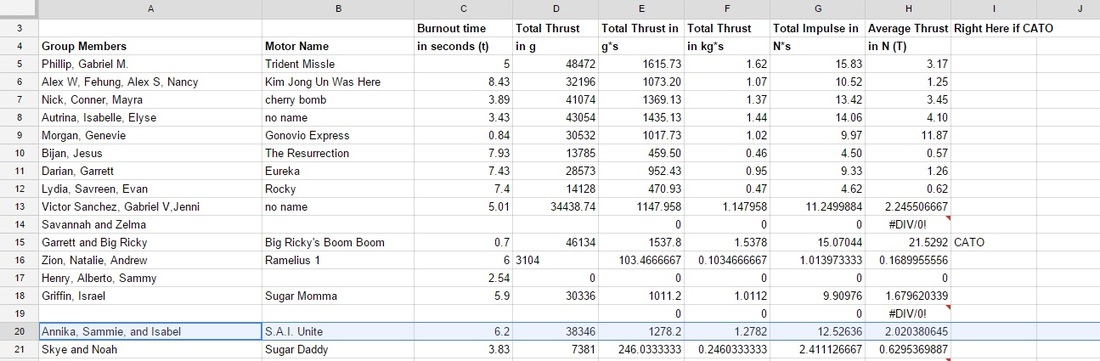 OUR FINAL DECISION: We will not be using our original motor design, we chose to use Autrina's motor design instead. Why did you choose not to? We thought ours did work, but did not work most efficiently. We got a good amount of thrust, but based on our graph, we didn't like the thrust curve ended up like. For our rocket we kinda want to do one that has an immediate shoot up in thrust that then goes down quickly, rather than what we have that shoots up and gradually goes to the peak of the thrust then slows down. It is not that our motor was unsuccessful, it was more on the fact that we want a stronger launch for our rocket. Why did you pick the new motor design? We picked Autrina's groups design because we saw a lot of things that we wanted for our rocket. They had a more significant amount of thrust than us, amounting to 43054, and on their graph the peak point was around 2000 g's of thrust in around 4 seconds. The time it took to reach the highest thrust was almost half the time we had, and in their graph it displayed a immediate shoot into the peak thrust. We were looking for this to happen with our motor. We will try to use their design for our future rocket. Hopefully it will be successful. Here is their design: Fuel Type: Black Powder Core Size: 3/16" Nozzle Size: 1/4" PHASE 1: Research and Picking Motor TypePurpose: This section's main project was the rocket motor project. In which we get in groups of 2-3 to create a working rocket motor. We are testing out different types of fuels and burners, and each group chooses a little different combination of them. We are creating motors and later we will test the thrust. We will see which motor type is the most efficient for our final project: Scratch Rockets. We will compare the different outcomes of each group and we will see which combination of burner and fuel brought us the most thrust. Group Members: On this project I worked with Isabel and Sammie. ____________________________________________________________________________________________________ The Beforehand Research: We were required to choose a fuel and a motor engine. To pick something most efficient, we were required to do research on each of the options. Motor choice - END BURNER or CORE BURNER Fuel choice - BLACK POWDER or SUGAR CHOOSING THE RIGHT BURNER/FUEL/SIZE COMBINATION: Initially, the combination our group had in mind was Core Burner and Black Powder. Before conducting much research, we all thought of doing that combination. We thought that core burner was the more practical decision, and we thought that we wanted more of a higher shot of thrust instead of the end burner giving us just a constant level of thrust. Along with the core burner, we chose to do gun powder. After doing more research we saw that since the distance that the flame travels is short in a core burner (from the edge of the core to the inside of the casing wall), core burners have short burn times. Knowing that gun powder has a faster burning time than sugar, we realized then that we couldn't do a gun powder and core burner combination. After talking to Andrew we also later realized that our motor would blow up if we combined those two options. We chose to keep black powder because we wanted a faster burn rather than a long burn that sugar gives us. And so, instead of choosing core burner, we chose to do end burner. Regarding the size of 3/16ths, we chose to do a smaller motor than what everyone else was doing. Why core burner and gun powder are not suggested to work together? I learned that core burners have a smaller nozzle, and so fast burning fuel like black (gun) powder will not work well with that. So much energy will be released from the fast burning black powder, and that isn't good for a burner with a small exit way (nozzle) such as the core burner. All the energy at once cannot exit the motor fast enough, and so the motor is very vulnerable of exploding. So much energy will be released and will not exit fast enough, all the energy contained will just blow up the core burner. That is why we switched from core burner to end burner. We then drew our diagrams for our choices. PLEASE IGNORE THE CORE BURNER LABEL.
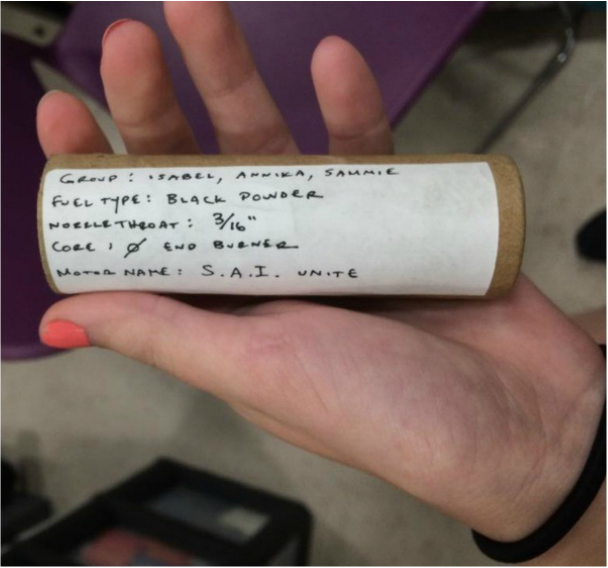
After this we got our brown cardboard motor and got a name plate to write our group name and important information on it. Here is our FINAL INFORMATION:
 Next post we will continue work on this project! We will be testing these motors out soon! Today in class, Andrew gave us an opportunity to get points. He did an activity on Chemical Reactions, which later became a class wide assignment. Purpose: Discovering more about chemical reactions and the periodic table of elements, also making H20 with Combustion Group Members: Griffin, Israel, Juan ____________________________________________________________________________________________________ Beforehand Lesson: Andrew briefed us on chemical reactions and the periodic table before conducting the actual experiment in our groups. What is a chemical reaction?
What is a combustion reaction?
Thermodynamics of Chemical Reactions
 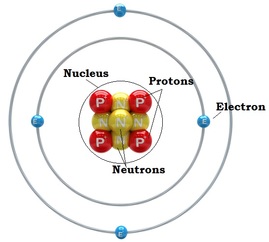 Periodic Table of Elements:
  Materials:
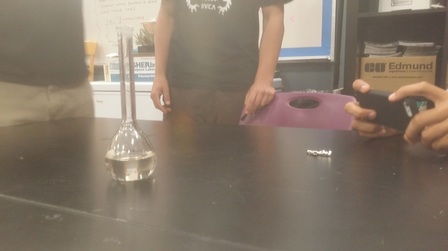 Directions:
What happened? A Chemical Reaction Story So I did this project assignment with Griffin, Israel and Juan. After we acquired our necessary materials. We filled up the beaker with water and began to mix in the citric acid. Of course nothing happened, but then Andrew passed around the coil of magnesium. He demonstrated how to coil the long strands and then Griffin followed and coiled it for us. We dropped it in. Slowly it appeared as if it were boiling in the beaker. The liquid itself was bubbling and when we all tried placing our hands on it, we felt that the beaker itself was gradually getting warmer. After awhile we noticed a strong scent in the air. We realized it was from the magnesium in the citric acid. We cringed at the burning scent for it was not exactly a pleasant one. Andrew then passed out the black balloons. We put over the balloon onto the beaker. We waited for the balloon to slowly fill up with the hydrogen exerting from the chemical reaction between the magnesium and the citric acid. Slowly the balloon filled up, not as big as a standard sized party balloon, but to about a circumference of 3 1/2 inches. 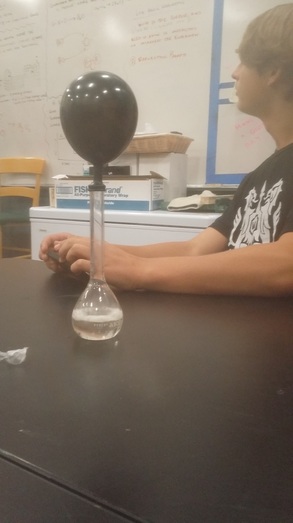 When we said the balloon was filled up, Andrew tied it off and let us play with the balloon. The balloon was floating on its own and if we weren't careful, it would fly up towards the ceiling like another person's did. By the time we were done playing with it, we went to go light up the balloon to see the combustion reaction happen. One by one we waited in line to light up our table's balloons. When it was our turn, Israel tied the balloon to a long beam that he would later place next to the fire to make it explode. Andrew turned of the lights and with a match, lit up a birthday candle on the table. Israel slowly dropped our balloon onto the match, and at the very second it made contact with the fire, there was a mini explosion. THE COMBUSTION REACTION was a success. There was hydrogen in the balloon due to the chemical reaction between magnesium and the water/citric acid. And we filled up the balloon with the hydrogen energy. Then we lit up the balloon so it could exert the energy out into a small scale explosion. The energy radiating from the match was the enough amount of energy (aka the activation energy) to initiate the chemical reaction. What I learned? Noticed?
Afterthoughts: I thought the whole experiment went well. At first I couldn't understand the examples he was givingon the periodic table of elements. But afterwards I understood it. The actual things we learned were really helpful, I learned a lot about periodic table which will be very helpful for the future. I thought that surprisingly our balloon filled up the most. It was the biggest balloon, why is that though? I thought overall we did well, nothing could have really gone wrong. It was cool seeing the balloon float on its own. It's hard to explain how everything works in general but it's slowly becoming easier to understand after doing more research and more worksheets on it. It was cool seeing the explosion happen due to the combustion reaction. It kind of made me think about how much more of an explosion we could make if we made a reaction on a much greater scale. What would you do differently? I would probably have time lapsed the burning sensation of the magnesium to the citric acid. I would have documented a lot more, regarding the notes we took on the research beforehand and also the whole experiment as a whole. Next time I want to document more and I want to not procrastinate when it comes to blogging. |
AuthorWrite something about yourself. No need to be fancy, just an overview. Archives
December 2015
Categories |


 RSS Feed
