 Purpose:
Group Members:
____________________________________________________________________________________________________ Beforehand Research: Bismuth: A chemical element with symbol Bi and atomic number 83. Bismuth, a pentavalent post-transition metal, chemically resembles arsenic and antimony. It's appearance is a brittle redish-gray material Bismuth is a metallic chemical element that is classified among the group of elements colloquially known as “poor elements” in the periodic table. This element has a number of uses, making it common in industrial applications. Many consumers own products which contain bismuth, although they may not necessarily interact with the element directly. Melting Process
Important things to keep in mind:
Coloring Process:
____________________________________________________________________________________________________ Safety Precautions: Safety:
Before Lab Thoughts: I saw other people doing this bismuth lab and I was very curious to see what the outcome would be. I saw people getting different colors of their bismuth every time. Our group decided on a specific color we wanted. We wanted the color blue. This time we worked with a new person, Natalie. She had background knowledge on bismuth and showed a lot of eagerness to do the lab. It was cool working with a new person and it was useful that she already knew how to do it. I was looking forward to seeing how it would turn out. I was a bit afraid of being burnt. ____________________________________________________________________________________________________ Materials:
Directions:
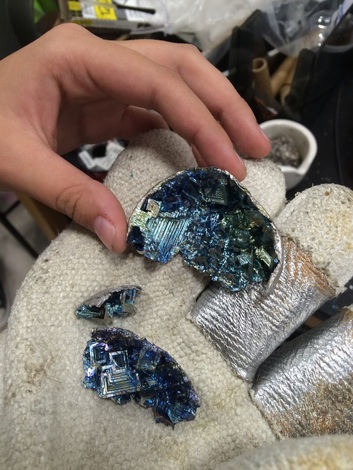
____________________________________________________________________________________________________ What Happened? A bismuth Story Our group finally got the heat plate! Sadly there are no other heat plates besides one. We had reserved the hot plate for the period. We used the leftover bismuth from the group before us. It took some time because the bismuth was stuck to the sides of the first small measuring cup we used and the hot plate heated up the bottom. We first began by heating up the hot plate at 530 degrees like we were told to do. It took awhile before it heated up all the way. We were then given our piece of bismuth. We were required to cut it up into smaller pieces so they could fit into our small pots that we were to heat on the plate. 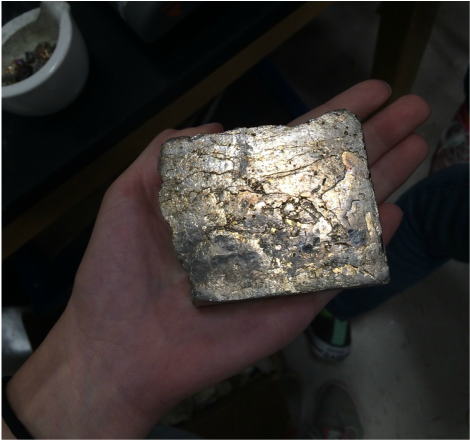 We placed the chunks of bismuth into the pots. It took awhile before the bismuth actually melted. It was difficult to stop people from knocking the table. We were supposed to keep the surface as still as possible. But since people always crossed our path to go to talk to Andrew, they'd bump into the table a lot and our bismuth would move a lot. That was probably because of our choice of area. Maybe we should've sat somewhere that was a less frequent path for people. 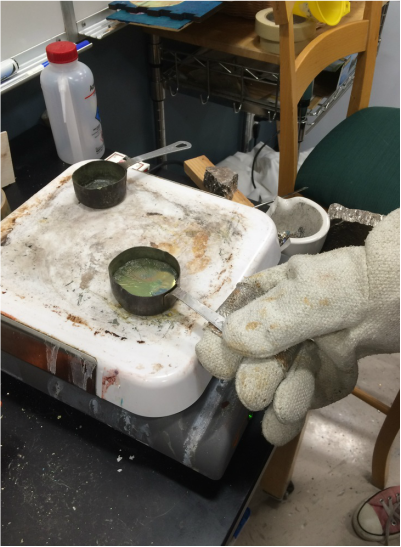 After a few minutes our bismuth was actually melted. We had to shake the container and watch for ripples in the liquid bismuth to check and see that it has all melted. The gray and yellow stuff that was described in our research, or the slag was there starting to appear. We quickly got a scraper to scrape and scoop it out into a mug. One of my group members was the one that attended to the bismuth now and continuously. They continuously scraped off the slag and kept the melted bismuth clean. 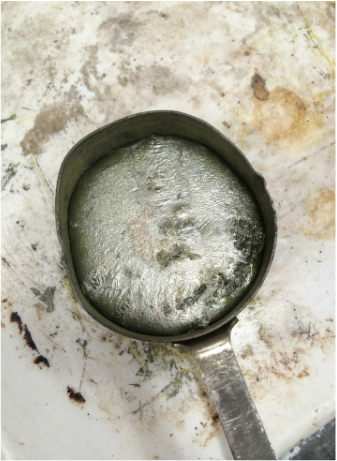 Wearing mitts we poured our bismuth into the second larger container at this point. We were at the point where we could use the coloring process. Since the majority of my group members wanted blue, we did neutral to little oxygen exposure. 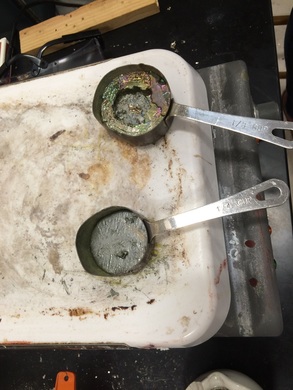 To get oxygen exposure, we tapped the table and shook the bismuth. We then took it off the hotplate to let it cool. We scraped off the slag again, and later we found out that we didn't scrape it off enough. At this point, we poured the excess liquid into the 1st smaller cup again. We then saw that there were bluish crystals left behind. 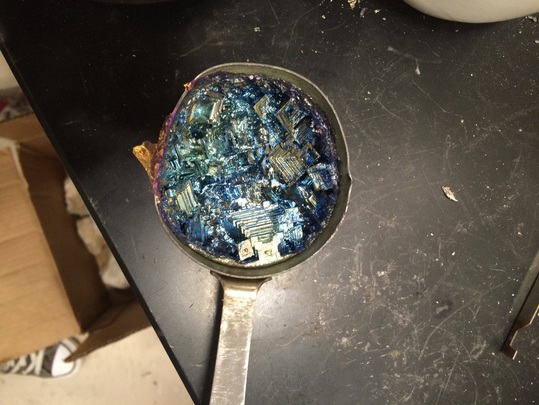 We were left with these crystals. We were all very excited and amazed by our work. We then hit the top of the cup onto the table. Getting our bismuth pieces out. I noticed that the bottom area and sides that touched the cup stayed gray like its original form. It had not been exposed to oxygen so that's why it stayed like that. We each took our own individual bismuth pieces!  (____________________________________________________________________________________________________
What I learned/noticed?
Questions I had/researched?
Bismuth has a rhombohedral crystal structure, so it will form angular crystals. It forms those elaborate hopper crystals because the edges of the crystal structure are more energetically favorable positions than the interior and faces. That makes the molecules continue to form crystal edges but never fill in the centers when crystallizing out of solution.
Since these waves are in very close proximity they will interfere with one another; creating a new wavelength (or even cancelling one another out). This depends on how much the two waves are offset from one another, which depends on the thickness of the film. As the thickness increases so does the distance of the reflected waves, until the colours fade off into grey noise. (Interesting note; thin-film interference is also responsible for the dazzling colors in a bubble and the rainbows in an oil-spill) What could've been better? Differently? I overall think we did a good job, its just that we left over slag on our bismuth as it was being crystallized. It most likely affected the appearance and quality of our crystals, maybe it could've been a bolder shade of blue all through out with a consistency, and maybe we would have more "Staircase" pieces, rather than areas of the end product that we couldn't use. We could've done this lab with a smaller amount of people. There were 4 of us and I believe that the lab didn't require more than two people to do it together. I feel that if we were in smaller groups we would've has more to contribute and would all be more engaged, rather than one or two people doing most of the things. If I were to do this again, I would plan on making actual jewelry that we can sell to the public. I feel that bismuth necklaces would be a very unique type of necklace and surely people would think and consider investing in them. I would want to do more research on what kind of chains or jewel holders could we have used to attach our rocks to. What I enjoyed? I enjoyed working with more people even if it wasn't necessary. It was my first time working with Natalie and I can say that she was very knowledgeable about bismuth and she really took the initiative to teach us and helps us learn how to make it. I am thankful for the extra help she gave us. I was happy with outcome. For the most part we followed the rules and I feel like our bismuth turned out just fine. We did our best and the pieces we had received from this experiment are definitely jewelry worthy! Group Work: I helped document things and helped melt the bismuth. I honestly think that our group should have been two groups since bismuth isn't really required to have 4 people. I feel that we learned a lot and that we finished the assignment successfully. We could have been more careful and patient, but overall our outcome was good.
0 Comments
 Purpose: To experiment on Sodium Polyacrylate and to try to expand the mass of it by adding water, creating "Fake Snow". Group Members: In this project I worked with Sammie. ____________________________________________________________________________________________________ Background Research: Sodium Polyacry is?
 Pre-Lab/Safety Precautions: Potential Health Hazards
Materials:
Directions:
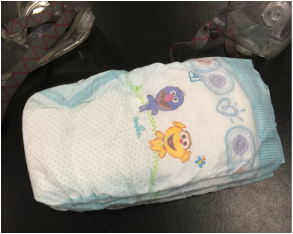
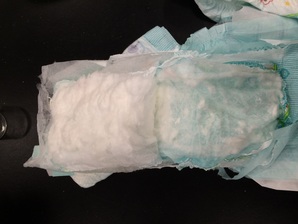
What happened? A fake snow story... Sammie and I decided to work together on this project again. We first put on safety glasses, then Braden corrected us and made us wear masks. Embarrassed, we pulled the masks on tight and began our work. We got one diaper, and like we were told, we opened up the diaper to acquire our sodium polyacrylate. We then began to extract the cotton, as you can see on the bottom right, we teared off the cotton, leaving the sodium polyacrylate to be extracted into our beaker.
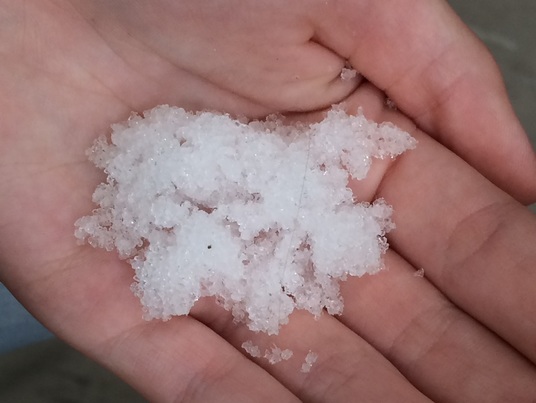
Then we got our sodium polyacrylate and scraped it into the beaker. It took awhile to get a good amount of the dust. We had to basically tear our diaper apart to get all we could. It was often scattered around the diaper. We poured a good amount of it into our beaker, we knew that we didn't need sooo much since the sodium polycrylate itself expands much more than in its current state. 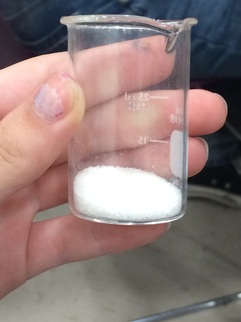 After getting a small amount of sodium polycrylate in our beaker, we then poured it into a bowl to start mixing it with H20. It slowly absorbed it when we began mixing it with our fingers. They popped up like little ball sponges. This time lapse shows our mixing process. Already we saw a big difference in the sodium polycrylate. It started off just barely filling up a layer of dust in our foam bowl. And already, after adding water, it filled up the whole bowl. We first got a consistency like the one below. A "snow" like consistency. Where it is more of the solid state of matter. 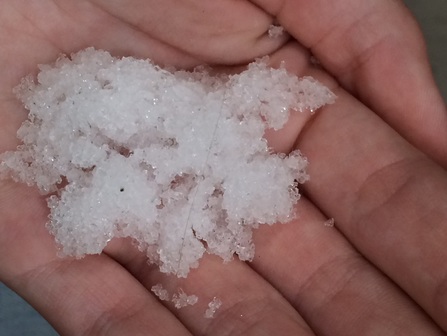 We then thought about what to do next. Sammie suggested that we add more water. I filled up a small beaker with water and threw it in with the "snow" like sodium polyacrylate. We wanted to just add in little by little, but later, after adding 400 ml of water, we had to move our snow to a much larger container. It began to leak and overflow out of the bowl, and so we got a large glass container. 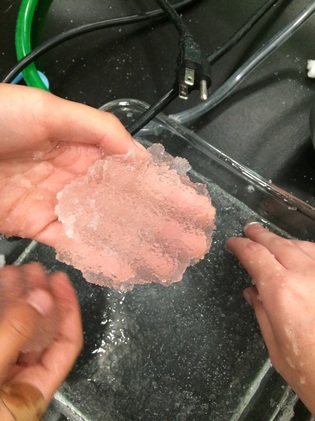 So at this point, the consistency is very "slushy" like. It appears like icy water. And at this point the state it is in is more of the liquid side, it can't hold a certain shape or volume. Like the water, the temperature of the actual sodium polyacrylate was cold. We finished our experiment at this point.
___________________________________________________________________________________________________ What I learned/noticed?
Questions I had/researched?
If I could do it differently?
PHASE 2 of Model Rocket - Launching StageThis is a continuation post of my first Model Rocket post. This includes the reflection of the whole entire experience, the questions I have, final outcome, etc. Purpose:
Group Members:
What happened? Another Rocket story, Near-death experience It is October 14th, 2015. And today is the day. The day where we set off our little rocket into the sky! I was very excited for this day, yet at the same time I was afraid of our little rocket failing miserably. I was confident in what we made but I still kept in mind that our rocket wasn't going to work 100% hands down for sure. Sadly Kazuha has left us, leaving Sammie and I as the only ones to fulfill the deed of letting our rocket go. Both Sammie and I had permission slips to go to fiesta island. So we both decided to go. Beforehand, we had to add the motor into it and all the last minute adjustments. We added the:
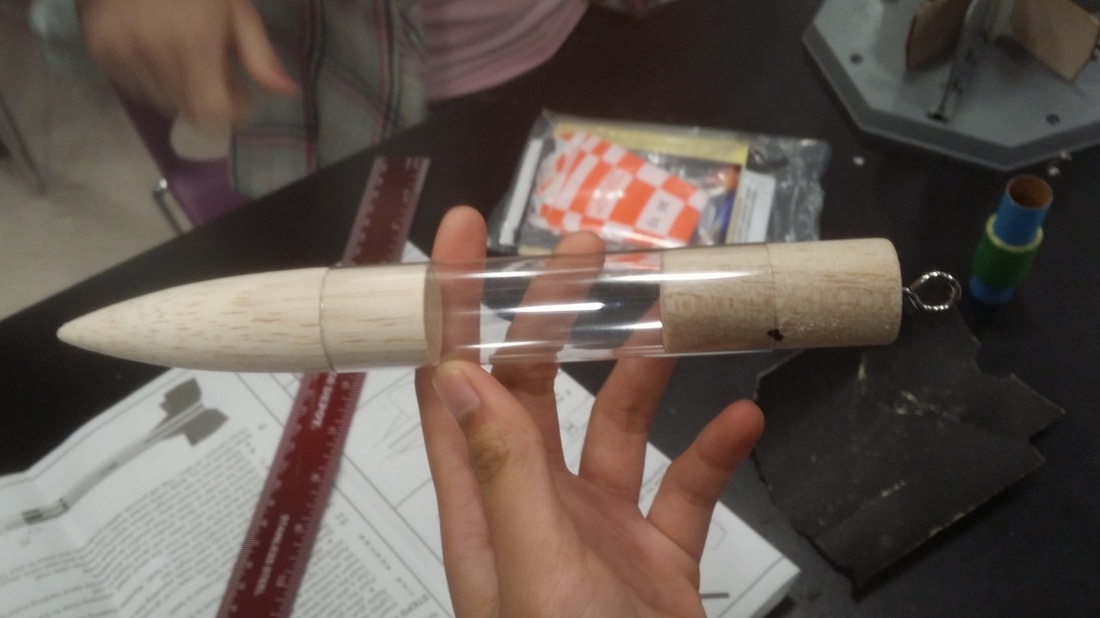
The photo below is our rocket before launching, in its final state. 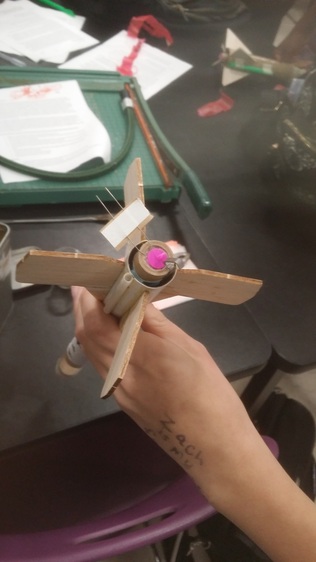 We then headed over to Fiesta Island with 5 other groups. After 10 minutes of driving, we arrived on the island. We walked to a clear area, dirt surrounding us. We set up our rocket launch pad right in the middle-ish of the dirt field. It was mixture of sand/dirt, so it made it hard to walk in. We volunteered as the first group to launch our rocket. I was honestly nervous to see what would happen. Both Sammie and I wanted to film the rocket being set up into the sky, so we let Braden launch our rocket himself. 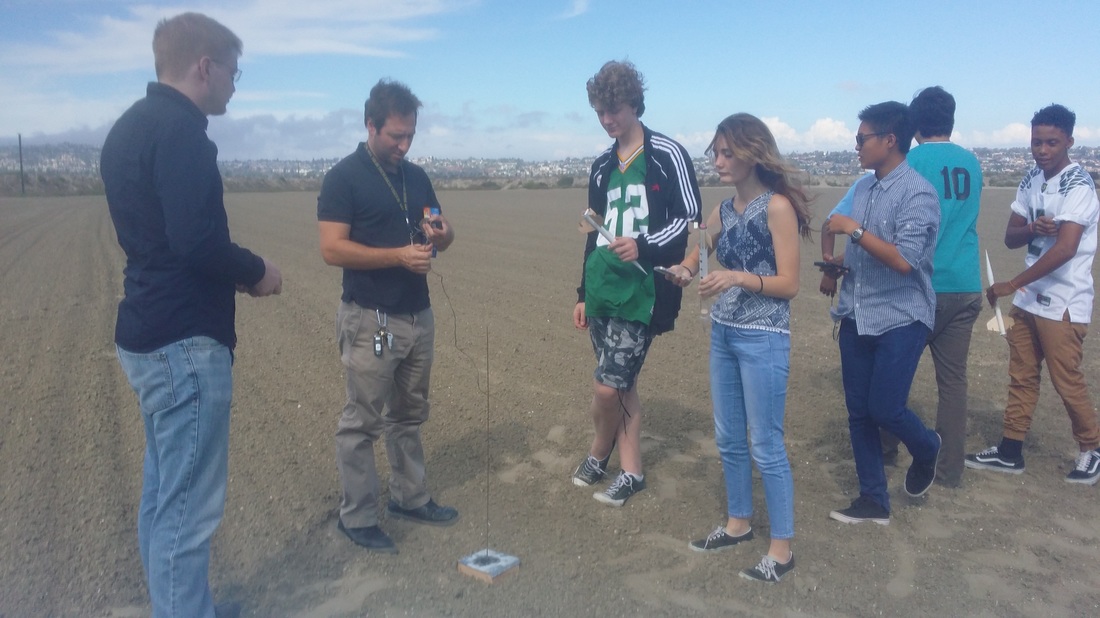 Now was the moment! It was history about to be made. We nervously watched as our baby was being lit up and shot into the sky. We stood back about 20 ft away as the rocket shot straight into the air. I couldn't catch the rocket as it flew into the sky very well with my phone, I realized how quickly it shot up there. In a matter of miliseconds, our rocket was already out of sight. I couldn't chase it with my eyes, for the white object seemed to fade into nothingness. My video wasn't very good for it lost the rocket at one point. Andrew had yelled during the video saying "It's parachutes out!" Sammie and I yelled with joy as our rocket was quickly being pulled by the wind into the far away hills of the island. It went so far, maybe even 100 ft or more away! I was blown away by how well our little rocket performed. Sammie and I ran towards it as we saw that it was slowly falling and landing. We ran in the dirt/sand, struggling to move quickly for the dirt got into our shoes and socks. We ran after Adarius and Skye who had just ran over to fetch it. We arrived at the hills, confused of where it could've landed. Skye and Adarius came and told us that it was around 10ft away from the water. Sammie and I jumped for joy, for that implied that it didn't just go far, it went REALLY far! Almost to the whole other area of Fiesta Island. I was proud of our rocket, and I was also proud of us as well as Kazuha who sadly couldn't be here to witness our work come to life today. We happily brought our not so damaged but kind of damp rocket back to the launching site. IT WAS A SUCCESS! Extra Story: All the other groups went. (We were the only girls there). And Adarius decided that he'll launch their scratch rocket. We all anticipated, Sammie and I finally making it back from the other side where our rocket landed. We all stood back. The rocket finally was launched and we laughed at how it zoomed in loops into the sky. It then turned at one point and faced our groups direction. It was like a missile was going to hit my face. It faced all of us and we panicked. Sammie and I jumped to the right as the rocket landed and made a crater into the group where Andrew and Braden were standing before it hit. We all laughed about it afterwards, saying that we can say that we almost got killed by a rocket :) ____________________________________________________________________________________________________ What I learned/noticed?
Questions I had:
Afterthoughts: I regret underestimating our rocket and our work itself. I feel that we did a fair job at creating our rocket, and I shouldn't have discredited our work by simply saying "I feel like ours won't work...". I was totally proven wrong after our rocket was launched. It was one of the better rockets there today and I believe that it was the one that went farthest from launching site. The reason I doubted our rocket was because I checked it the day before and saw that our fins were completely off centered, they weren't perpendicular with each other. I thought that it would greatly affect the performance of our rocket. But to my surprise, the rocket worked very efficiently, and our uneven and sloppy fins didn't take away from it and it's performance in any way. I really enjoyed the build up from creating our rocket to finally seeing it being shot into the air. I am very much looking forward to seeing more launches and to building another rocket! This was just our first rocket, and it was a model rocket. I am interested to see how a scratch rocket would work and how we will build it and such. I hope I can continue to work with Sammie for I believe that we are a good team together. We got everything good on time, and although our rocket wasn't exactly perfect, look wise and such, it performed the best of its abilities, and MADE US PROUD! If I could do it differently: If I were to do this again, I would probably attend to the rocket better, I would probably check if it was straight and check if everything was fine before pushing through with it. I'm not sure if adjusting or fixing the crooked fins would make a difference, but I believe that it was sort of careless for me to just let it dry that way and to not do anything about it. I would also want to put a camera into the payload! I'm so angry I forgot about that. I was looking forward to it yesterday, seeing our rocket shoot into the sky in both our people point of view and the view of the rocket. I am not sure if it would've damaged that camera or what but I want to try to do that at some point. I really want to see a view of the sky from the rocket! I would also want to mark the distances of the rocket from launch site to landing point. I want to see which rockets went further, and to compare and contrast, possibly finding out what makes the rocket go highest or furthest. What I enjoyed? I honestly enjoyed the majority of the process that it took to make the rocket. I feel that it was a smart choice to do this in this section and I am very glad to be able to say that "I BUILT A ROCKET!" and that it actually worked efficiently. It was interesting seeing how the rocket comes all together. I didn't know whether or not the kit would be easy to follow, but after building it, I realized that it was a great way of getting amateurs like my group and I to build a very efficient rocket. People like us knew nothing about rockets and now we made one that worked well! I am very glad that I did this and I look forward to learning more about rockets and making more rockets. The best part was watching our little star covered "S.S.Bae Bray" fly into the sky. And being astonished at how high it went, to the point where we lost it with our eyes. We couldn't find it at first but we luckily saw where it landed. I am proud of the work my partners and I did. I sent the rocket video to Kazuha who is currently not with us, and she said it was amazing. The three of us did great work together. I am satisfied with our work done! Hooray! Group Work: I thought that my partnership with Sammie and Kazuha was great. We were a good group and I believe that we carried all of our responsibilities out well. We never had to put a pause to building rockets because one of the group members had unfinished business. We worked to get all our priorities done and we all moved ahead together. We each contributed, did our part. And it is thanks to all three of us that we made this successful rocket. I am happy to have been with these people. I look forward to working with Sammie again. And I hope that kazuha will see the rocket video I did a Unit 2 worksheet on Dimensional Analysis, the questions along with answers/work is written below. Unit 2:1 Dimensional Analysis - Take Home Quiz Questions
PHASE 1 of Model Rocket - Building StagePurpose:
Group Members:
Beforehand Assignments:
 Pre-Lab/Safety Precautions:
Materials:
 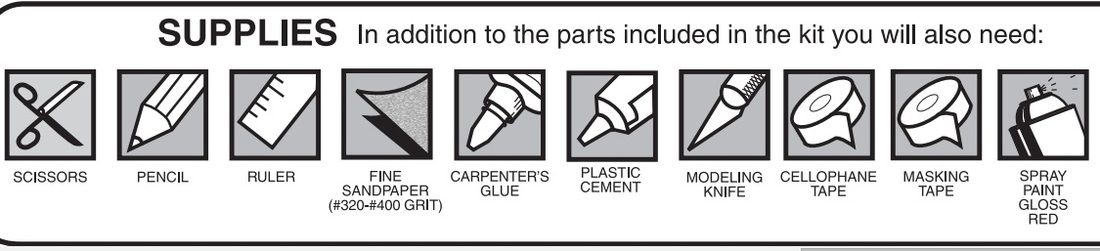 Supplies Needed:
Directions:
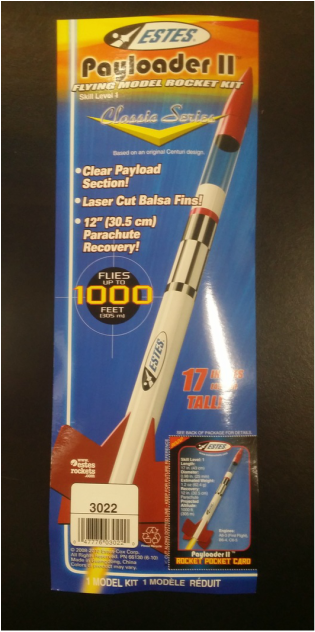
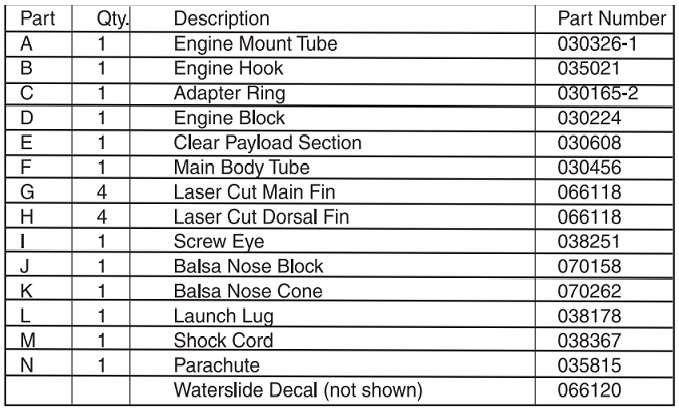
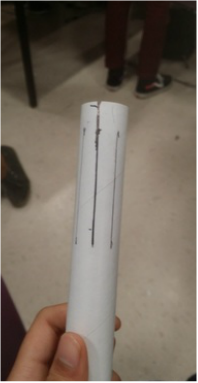
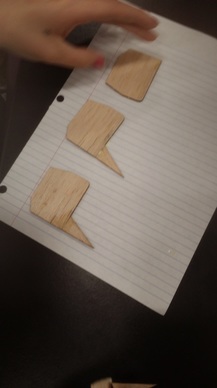
    Pre-Lab Thoughts I was honestly scared of building the rocket wrong or accidentally reading the directions wrong and messing up one of the steps. I was excited to build a rocket but also scared of the outcome. What if it didn't work? I was afraid of the rocket failing. I was interested to see the whole process of building a rocket, and I was beginning to think about how hard it is for NASA to build real rockets to be launched into orbit. I thought about how it must be so agonizing to build something of that scale, and then watch either launch successfully or totally fail in front of your eyes. Although our rocket is not as serious as theirs, I was scared to see the outcome. ____________________________________________________________________________________________________ What Happened? A Rocket Story! After Andrew quizzed us multiple times on what the different parts of the rocket were, we finally passed! Andrew gave us two options, the Payloader 1 rocket or the Payloader 2 rocket. We saw that other groups were all doing the Payloader 1, so we decided to pick the Payloader 2. We also enjoyed the idea of putting a lego figure in the plastic tube (one that resembles our favorite Academic coach) We took our model rocket and took it to our desk to unpack the supplies. There was a large pamphlet of instructions that given along with the different supplies. 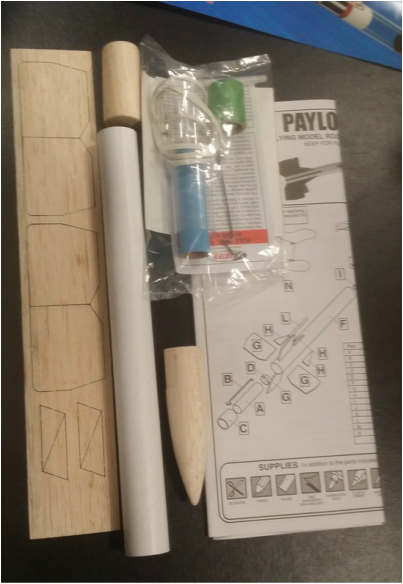 We began to follow the directions written in the instruction manual. First one of us grabbed the white cardboard tube and went to mark the lines. I was in charge of making the lines while Sammie and Kazuha glued the Balsa wood pieces together. It was difficult drawing the liens on the tube for I couldn't reach the doorway corner like it asked. So I used the shelf in the class to draw out my lines on the cylinder instead. I messed up a couple of times, leaving our cardboard tube sloppy. Sammie and Kazuha glued the balsa wood together with wood glue, it was difficult, for the drying time took very long. It was hard to keep the wood stuck together, and often times we would accidentally move the table, ruining the gluing process. We found the wood glue messy and it took awhile before we had our balsa wood pieces firmly together
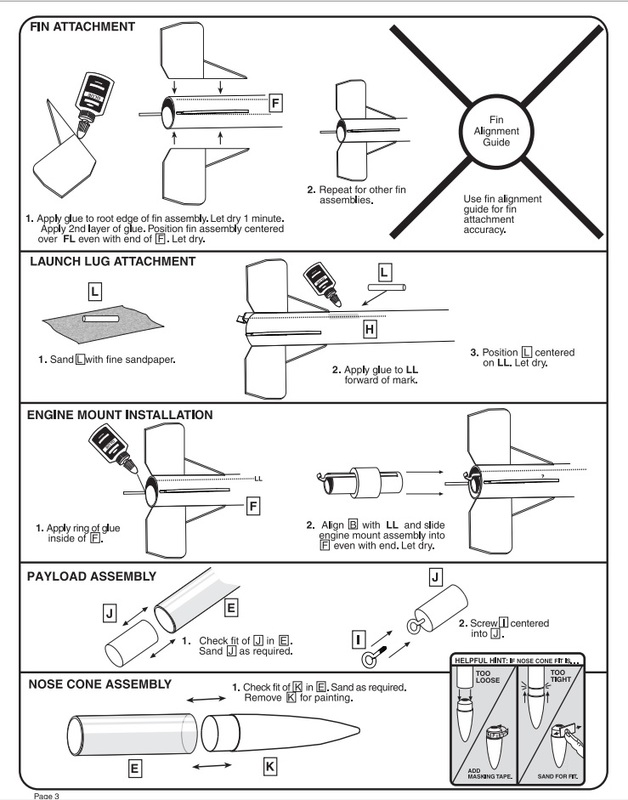
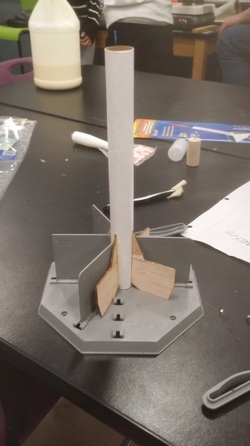
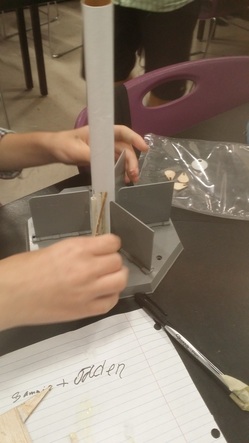
We then began to create our engine mount. Kazuha began following the directions to do that while Sammie and I began to do the "Fin attachment" area of the process. It was very difficult to glue on the fins straight, and so Andrew gave us a rocket holding stand. It held our rocket base in place, with little sockets to hold our fins as it stays and glues
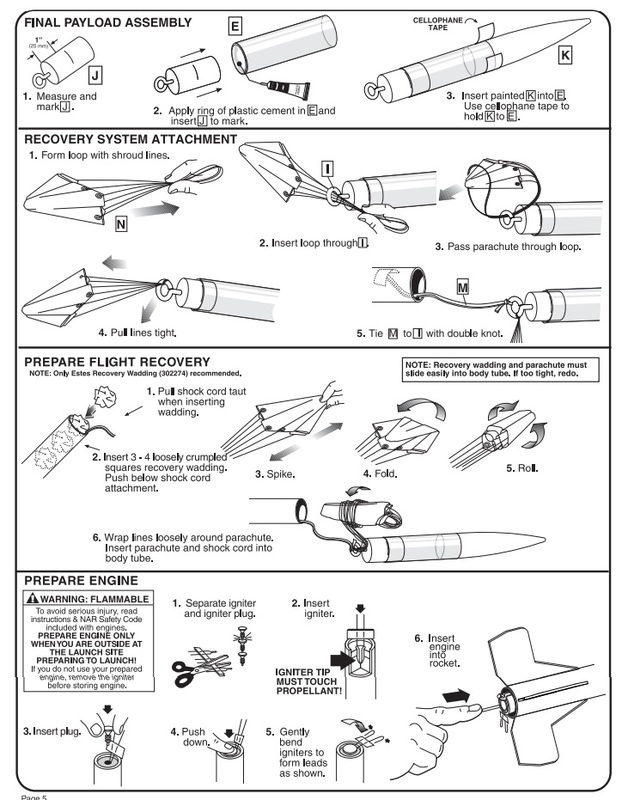
We then finished our engine mount, gluing it together with wood glue and later beginning our pay load section. We began connecting the upper areas near the rocket's nose together. We also created a hole in the balsa cylinder, which was a part of the payload. We began preparing the payload at this point.
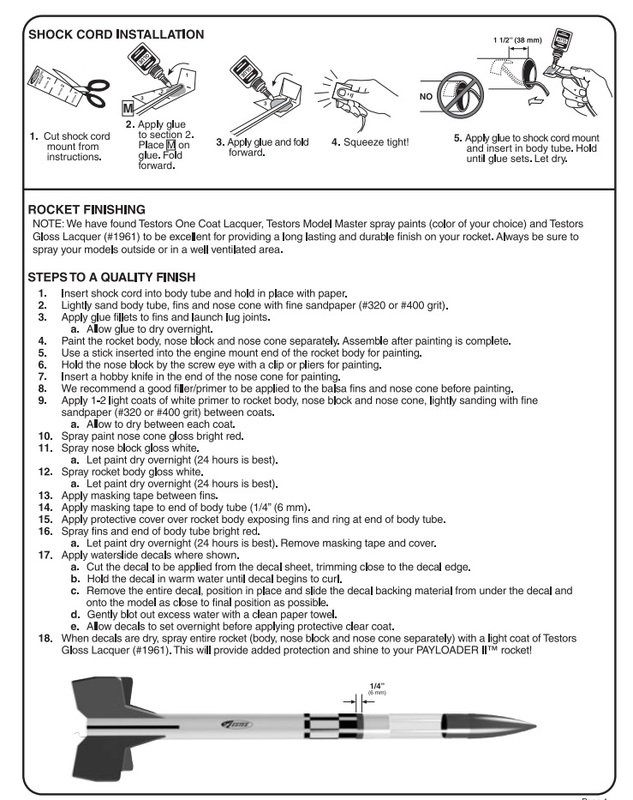
We then inserted the parachute and elastic shock chord into our rocket body, with our fins now dry onto the rocket's body. We attached the balsa wood tube to the plastic tube and placed the rocket's nose on the opposite half of the plastic, (as seen above). We we finished preparing the first part of the building process. We finished the overall body of the rocket, for the other part like adding the motor and such is done right before launching our rocket. Which is something we will get to in a bit. 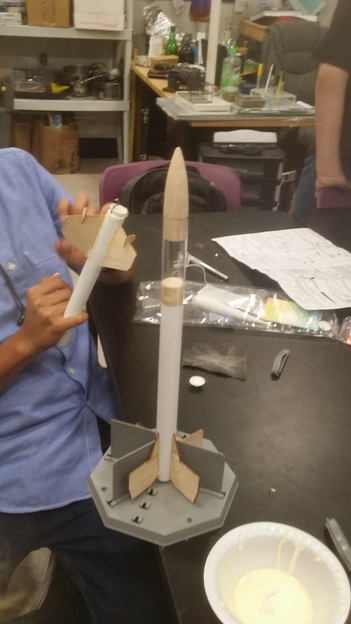 We then decorated our rocket, paying tribute to our favorite TA and calling it "S.S. Bae Bray". We were supposed to put stickers and such but all the "tattoos" that were supposed to print onto the rocket weren't working efficiently. We went and just put star stickers and printed out words on our rocket. We were to launch our rocket in the next few days,
Purpose:
Beforehand Research: We were required to do research about eye dilation before conducting the experiment.What we researched/learned?:
Materials/(Research):
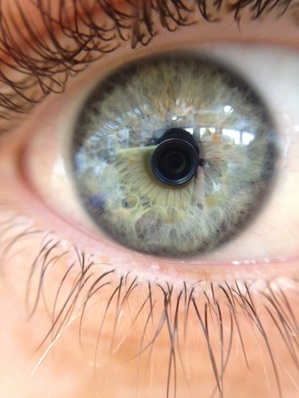
 What Happened? Another Eye story This was going to be more difficult than the other eye experiment. We were very excited to see how the eye would look dilated. But the problem was that an eye only dilates in the dark, and how do we get footage or document something that is in the dark? Photos or videos won't show up in the dark! We chose Griffin as our eye model, for we found his eye the most intricate out of the ones in the previous project we did. Our first idea was to go into a dim room in the school with dim lights to meet the best of both worlds. We thought that taking a video in a dimmed room may give the same effect as if it were a really dark room. It was extremely difficult trying to manipulate the eye to dilate. We'd have our eye model sit down in a chair in the recording room and since the room had adjustable lights, we'd start off with the room dim and then slowly turn the bright light up to watch his eye go from dilated to not dilated. We failed numerous times as I couldn't function the lights correctly, and the room was still to dark for Sammie to take a high quality video. The only video we got was blurry and dark. So we decided to change plans. We went outside near the other exit/entrance of the school near Nick's room. We saw as Grffin faced the doors, his eyes came out really clearly in the camera. We then suggested him to close his eyes for about 30 seconds or so, to manipulate the eye into dilating. We weren't sure if it would work, but on 3 we would ask him to open his eyes, recording all of it in the process. We were hoping to capture his eye slowly stop dilating. We watched the video that Sammie had took and we saw the pupil change from dilated to not. Amazed, we tried again, asking Griffin to keep his eyes shut for an even longer amount of time now. We took another video and noticed that it didn't have the same effect as the first one. We were left confused. Griffin then realized that in the first video, I had been standing in front of the door, blocking direct light exposure to his eye when he opened it. Knowing that, we tried another video, this 3rd time with me standing in front of Griffin. After taking the video, we happily looked at it. Noticing that the eye successfully went from being dilated to not being dilated. It came perfectly in the video and Sammie even slowed it down even more with an app to point out more of a significance difference in the transition. HERE IS THE VIDEO! ORIGINAL (NORMAL SPEED) BELOW IS NOT OUR FINAL PRODUCT FINAL PRODUCT (SLOWED DOWN) IT IS OUR FINAL PRODUCT. What I learned/Noticed?:
I had a few questions on this topic after the experiment. I noticed things that weren't ever explained. These are questions that I had in the aftermath.
Your pupils can also constrict and dilate as a result of a variety of medicines and drugs. In fact, doctors will often shine a light into a patient’s eyes to test the reaction of the pupil to determine whether the body appears t
___________________________________________________________________________________________________ What would you do differently?
What I enjoyed? Seeing someones eye dilated! It's so different from what I'm used to and it looks so much more interesting when the pupil is larger than usual. I was glad that we were able to find a solution to our "darkness" problem. We thought we needed complete darkness and we thought that filming an eye dilate in the dark was impossible. But we worked around those struggles and found a good way to push through. Group Work? I feel like Sammie and I worked together really well. We carried out all responsibilities in this assignment and we both gave up blogging time to carry out with the experiment. I hope we can work together again!
Purpose:
____________________________________________________________________________________________________ Beforehand Research: We were to research about different parts of the eye before taking pics.
Materials/(Research:
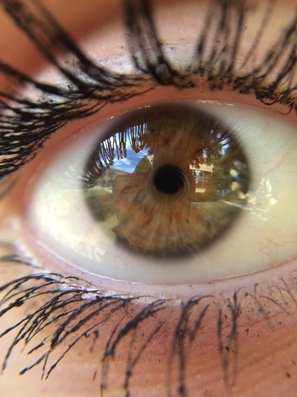
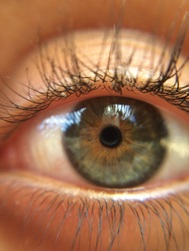
 What Happened? An Eye story We first clipped on the camera to Sammie's iPhone. When we put it on, we were confused because we couldn't get good high quality pics of things. We first went to take pictures of Sammie's eye. I couldn't get it to focus. Frustrated, I asked Braden for help. He demonstrated for us and showed us that to get good pics you have to get really really close to the object you want. We began taking pictures inside, and then realized that it was harder to get high quality photos with the lighting inside. We decided to go outside to take pictures with natural light exposure. There was a huge difference in out photos to when we took them inside. We were able to see more into the eye, in the light there was more exposure of the details like the area around the pupil. I found that the color of our eyes came out boldly when exposed to light, rather than inside. Brown eyes like Sammie's eye became a radiant hazel-brown in the light, rather than being a deep brown inside. We mainly took photos of people with blue, light brown, or hazel eyes. For eyes like mine that are a deep dark brown did not show up as intricately as eyes with lighter colors. Even with light exposure, my eyes did not show much lighter than they were without natural light exposure. I sadly did not receive any pictures of my eye. We asked Griffin, Isabel, and Miles (a 9th grade) to come outside with us to take pictures. We chose people with very detailed eyes and had eyes with great contrast to each other. It was difficult to take pictures due to the fact that we had to keep our eyes open for large amounts of time. It was also difficult for the phone camera to focus on the eye right away. Things like our eye lashes would get in the way, the camera would immediately focus on their eye lashes rather than their eyes. Which left the eye area very blurry. We had to get extremely close to people and we had to make very minimal movements. Any movement would un-focus the camera. It was difficult to get a perfect picture, and it required at least 2 people to take the picture. Although it took awhile, we came out with amazing pictures of people's eyes. You can see the pupil clearly, along with the gradient of colors that surround it. One of the photos was even close enough to see the minuscule red-pink veins along the Sclera of the eye. I noticed that every eye had a dark surrounding area of the iris. Each eye was very different, and the camera quality was very high definition, we could even see the reflection of the surroundings in the eye. ____________________________________________________________________________________________________ What I learned/Noticed? Light exposure (natural) creates a lighter appearance of your eyes. Important terms:
Questions I had Afterwards/Researched Answers: I had a few questions on this topic after the experiment. I noticed things that weren't ever explained. These are questions that I had in the aftermath.
____________________________________________________________________________________________________ What would I do different? If I had more time I'd probably try experiment more with the camera, possibly asking more people to take photos of their eyes. We only covered 4 different people, and it would have been interesting to see different eyes. We were limited due to time but I believe that if we had more time that we would have gotten a lot more pictures. If I were to do more, I would follow up with more research about the questions I had. I would have also tried taking more pictures of things besides our eyes, there are many things I could've taken a picture/photo of. |
AuthorWrite something about yourself. No need to be fancy, just an overview. Archives
December 2015
Categories |

 RSS Feed
