Purpose:
____________________________________________________________________________________________________ Beforehand Research: We were to research about different parts of the eye before taking pics.
Materials/(Research:
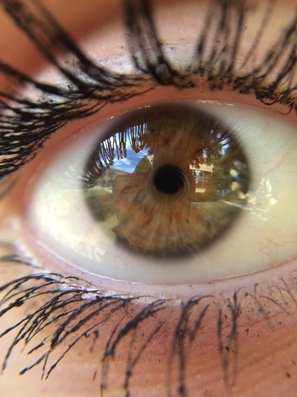
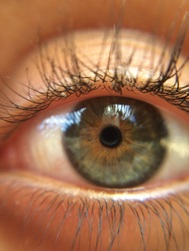
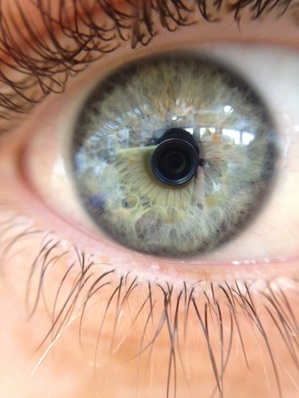
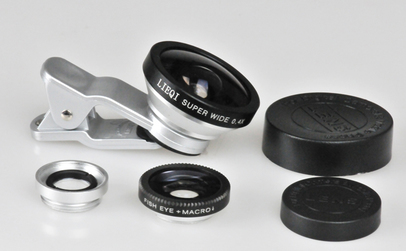 What Happened? An Eye story We first clipped on the camera to Sammie's iPhone. When we put it on, we were confused because we couldn't get good high quality pics of things. We first went to take pictures of Sammie's eye. I couldn't get it to focus. Frustrated, I asked Braden for help. He demonstrated for us and showed us that to get good pics you have to get really really close to the object you want. We began taking pictures inside, and then realized that it was harder to get high quality photos with the lighting inside. We decided to go outside to take pictures with natural light exposure. There was a huge difference in out photos to when we took them inside. We were able to see more into the eye, in the light there was more exposure of the details like the area around the pupil. I found that the color of our eyes came out boldly when exposed to light, rather than inside. Brown eyes like Sammie's eye became a radiant hazel-brown in the light, rather than being a deep brown inside. We mainly took photos of people with blue, light brown, or hazel eyes. For eyes like mine that are a deep dark brown did not show up as intricately as eyes with lighter colors. Even with light exposure, my eyes did not show much lighter than they were without natural light exposure. I sadly did not receive any pictures of my eye. We asked Griffin, Isabel, and Miles (a 9th grade) to come outside with us to take pictures. We chose people with very detailed eyes and had eyes with great contrast to each other. It was difficult to take pictures due to the fact that we had to keep our eyes open for large amounts of time. It was also difficult for the phone camera to focus on the eye right away. Things like our eye lashes would get in the way, the camera would immediately focus on their eye lashes rather than their eyes. Which left the eye area very blurry. We had to get extremely close to people and we had to make very minimal movements. Any movement would un-focus the camera. It was difficult to get a perfect picture, and it required at least 2 people to take the picture. Although it took awhile, we came out with amazing pictures of people's eyes. You can see the pupil clearly, along with the gradient of colors that surround it. One of the photos was even close enough to see the minuscule red-pink veins along the Sclera of the eye. I noticed that every eye had a dark surrounding area of the iris. Each eye was very different, and the camera quality was very high definition, we could even see the reflection of the surroundings in the eye. ____________________________________________________________________________________________________ What I learned/Noticed? Light exposure (natural) creates a lighter appearance of your eyes. Important terms:
Questions I had Afterwards/Researched Answers: I had a few questions on this topic after the experiment. I noticed things that weren't ever explained. These are questions that I had in the aftermath.
____________________________________________________________________________________________________ What would I do different? If I had more time I'd probably try experiment more with the camera, possibly asking more people to take photos of their eyes. We only covered 4 different people, and it would have been interesting to see different eyes. We were limited due to time but I believe that if we had more time that we would have gotten a lot more pictures. If I were to do more, I would follow up with more research about the questions I had. I would have also tried taking more pictures of things besides our eyes, there are many things I could've taken a picture/photo of.
0 Comments
Leave a Reply. |
AuthorWrite something about yourself. No need to be fancy, just an overview. Archives
December 2015
Categories |
 RSS Feed
